
- Smoke generator for LEGO Powered Up Train
- The Powered Up Smoke Engine
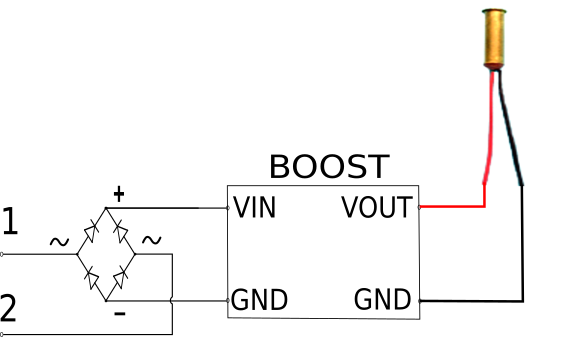
I will now explain how to connect a smoke engine to the Powered Up Hub – a method that can be used for several type of electric or electronic devices, not just a smoke generator.
First we need to remember the pinout. I show here the female plug on the hub, it’s easier to see the pins:
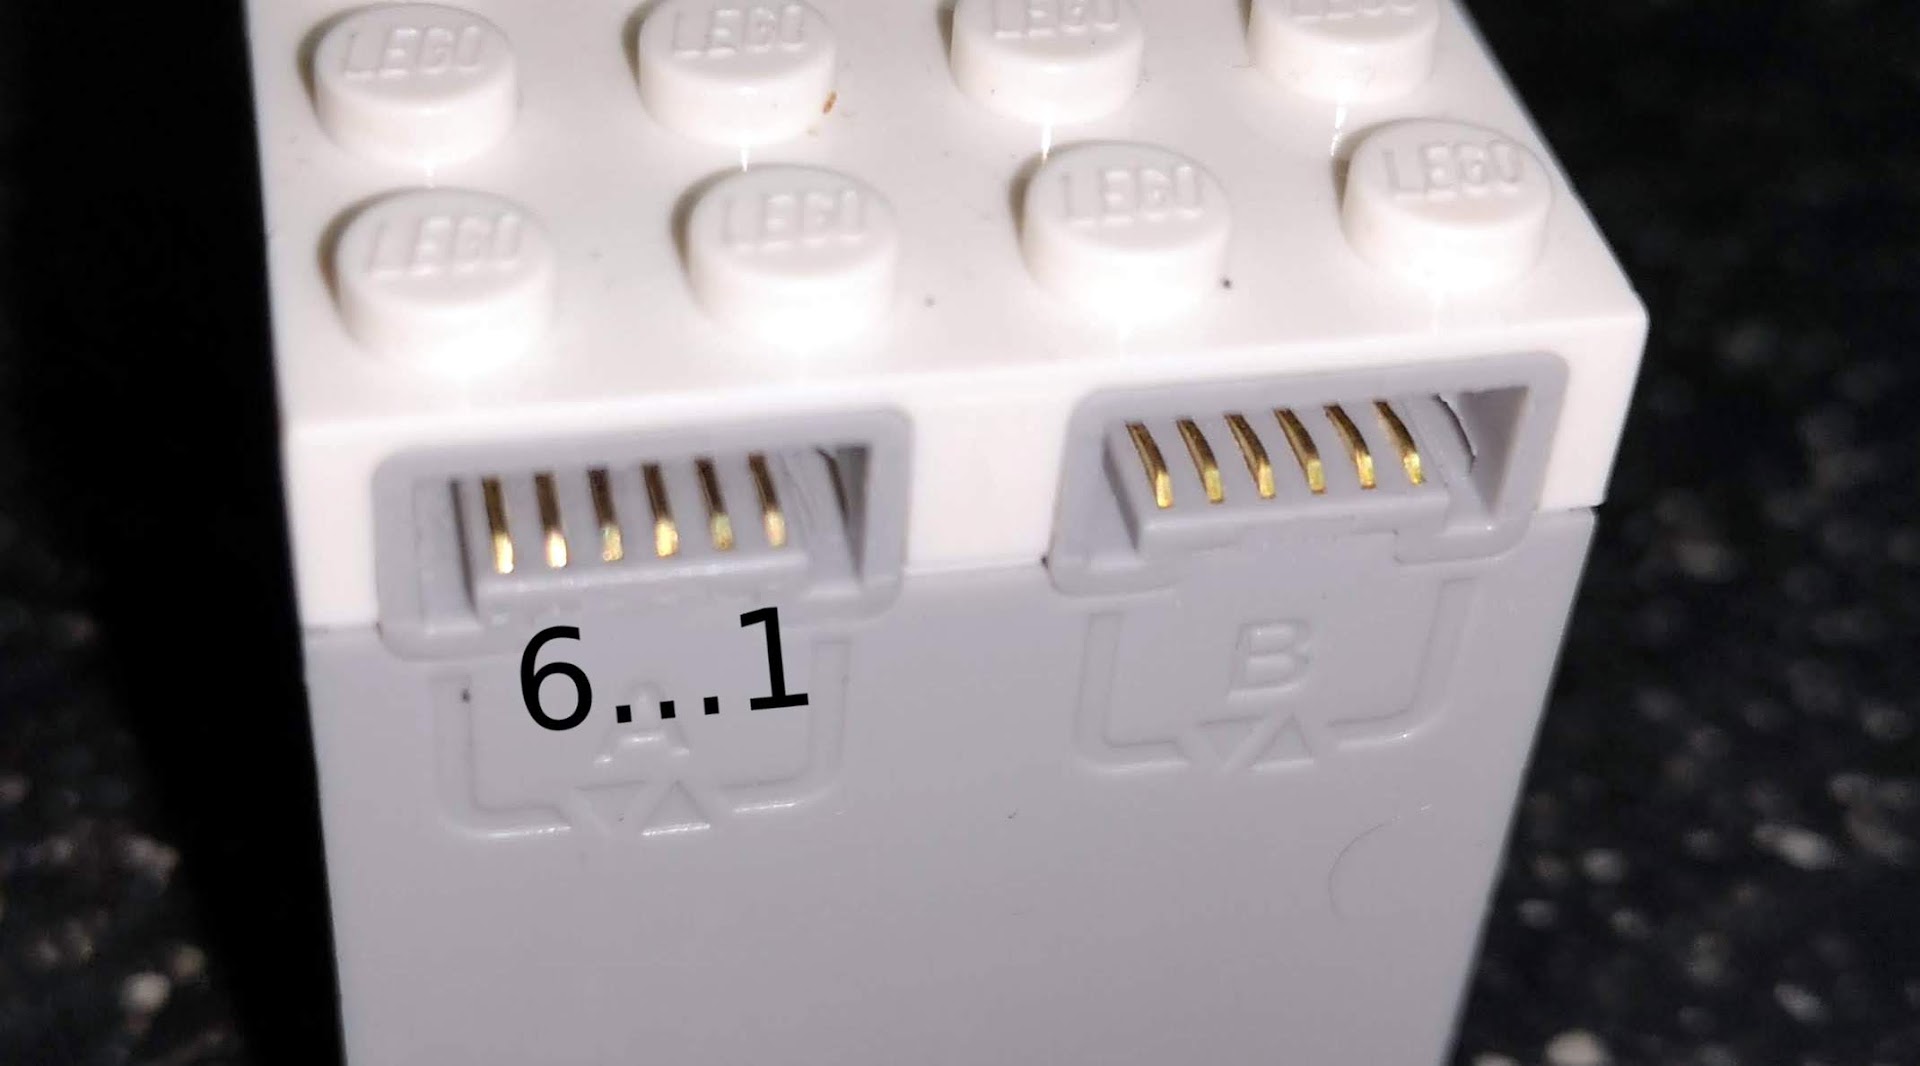
Thanks to JopieK who opened up is PUP Train Motor for the good of science we already know the names given to each pin by LEGO:
1 – M1
2 – M2
3 – GND
4 – VCC
5 – ID1
6 – ID2
These are the names from the Train Motor side, not necessarily from the Hub side (some of us suspect that pin 5 and pin 6 combine Analog Input and UART functions). For this post purpose these names are enough.
So to emulate a PUP Train Motor we just need to short ID1 to VCC and ID2 to GND and use the M1 and M2 pins:

So I used a PF2 available cable (don’t ask) and stripped the insulation off, joined wire 3 to wire 6 and wire 4 to wire 5 and soldered these two junctions:
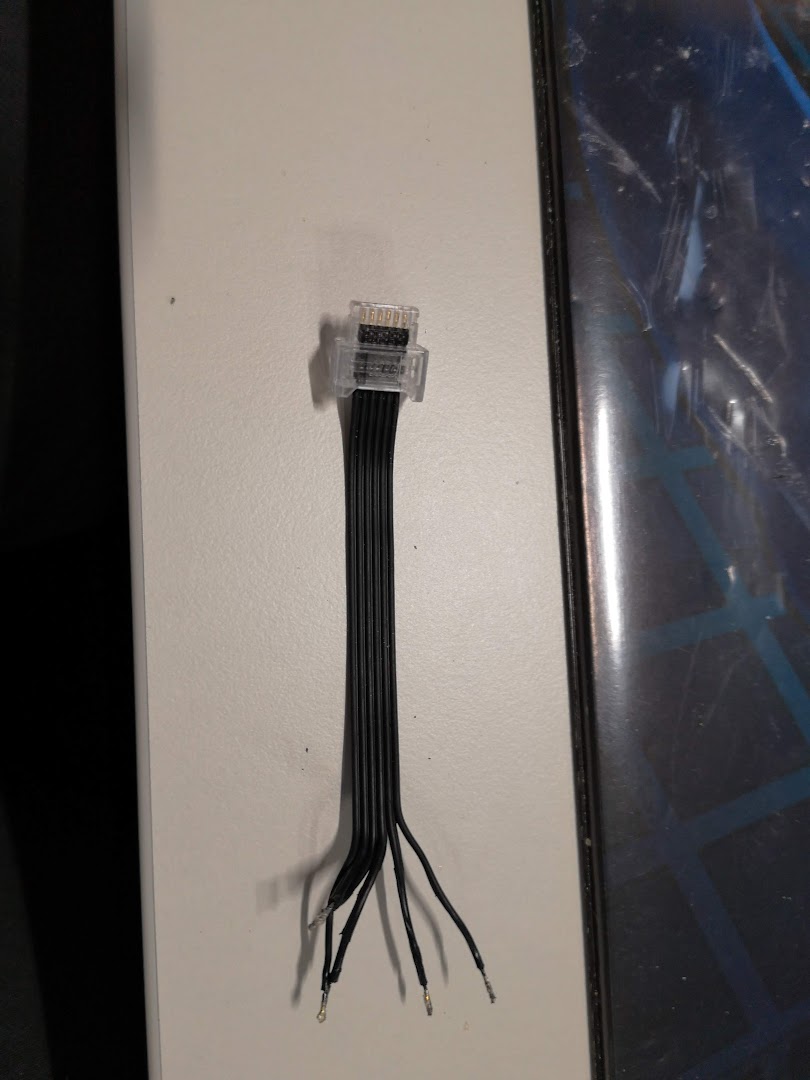
Then used heat shrinking tube to isolate these junctions:
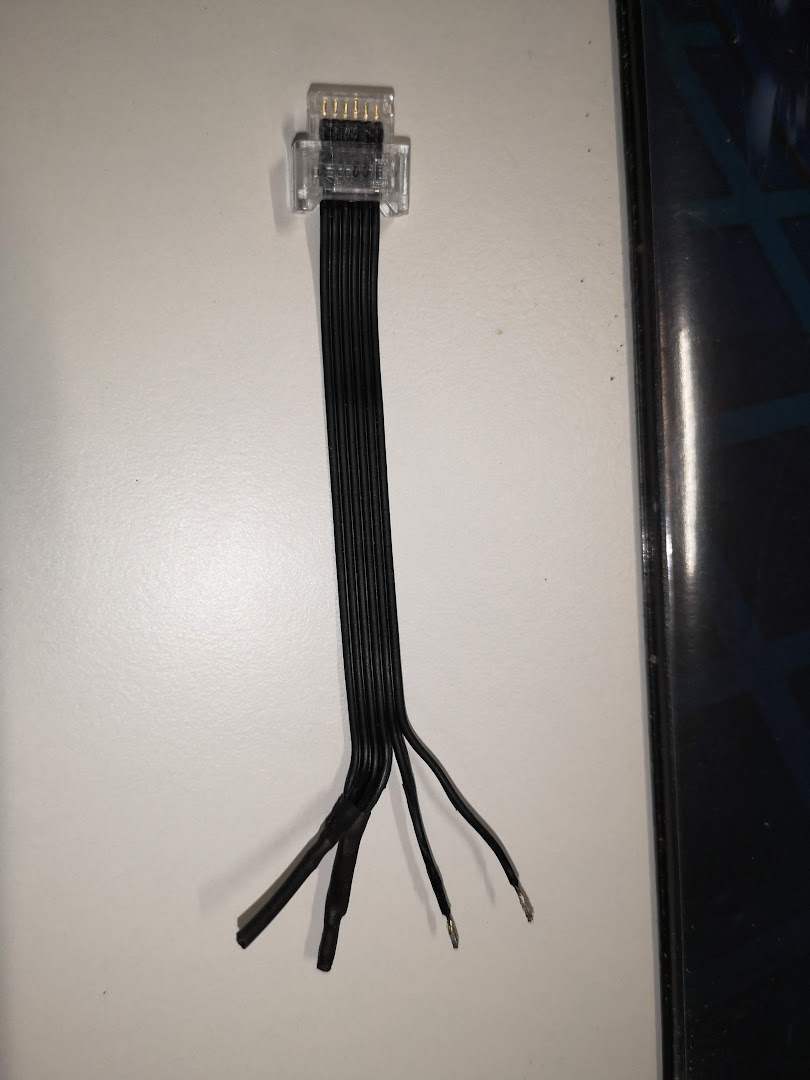
The two remaining wires can now be used to control anything we want with a PWM signal of near 9 Volt (from M1 to M2 or M2 to M1, depending on the direction we choose for the “train motor”). This is the same signal of Power Functions so if we want to connect a LEGO PF motor we just need to connect these two wires to C1 and C2 of a PF connector.
But I want to use a Seuthe Nr. 99 smoke generator for H0 scale trains:

This little device operates with a voltage between 8 and 14 Volt and consuming around 140 mA. My previous experiments with PF revealed that I would need more than just 8V so direct attaching it to a PF cable wasn’t enough, I needed a boost circuit to raise voltage a bit – I used a small circuit and trimmed it to ~11.2 V.
It worked quite well with my PF version of the BR80 so I just reused the circuit, replacing the PF cable with this PUP cable:
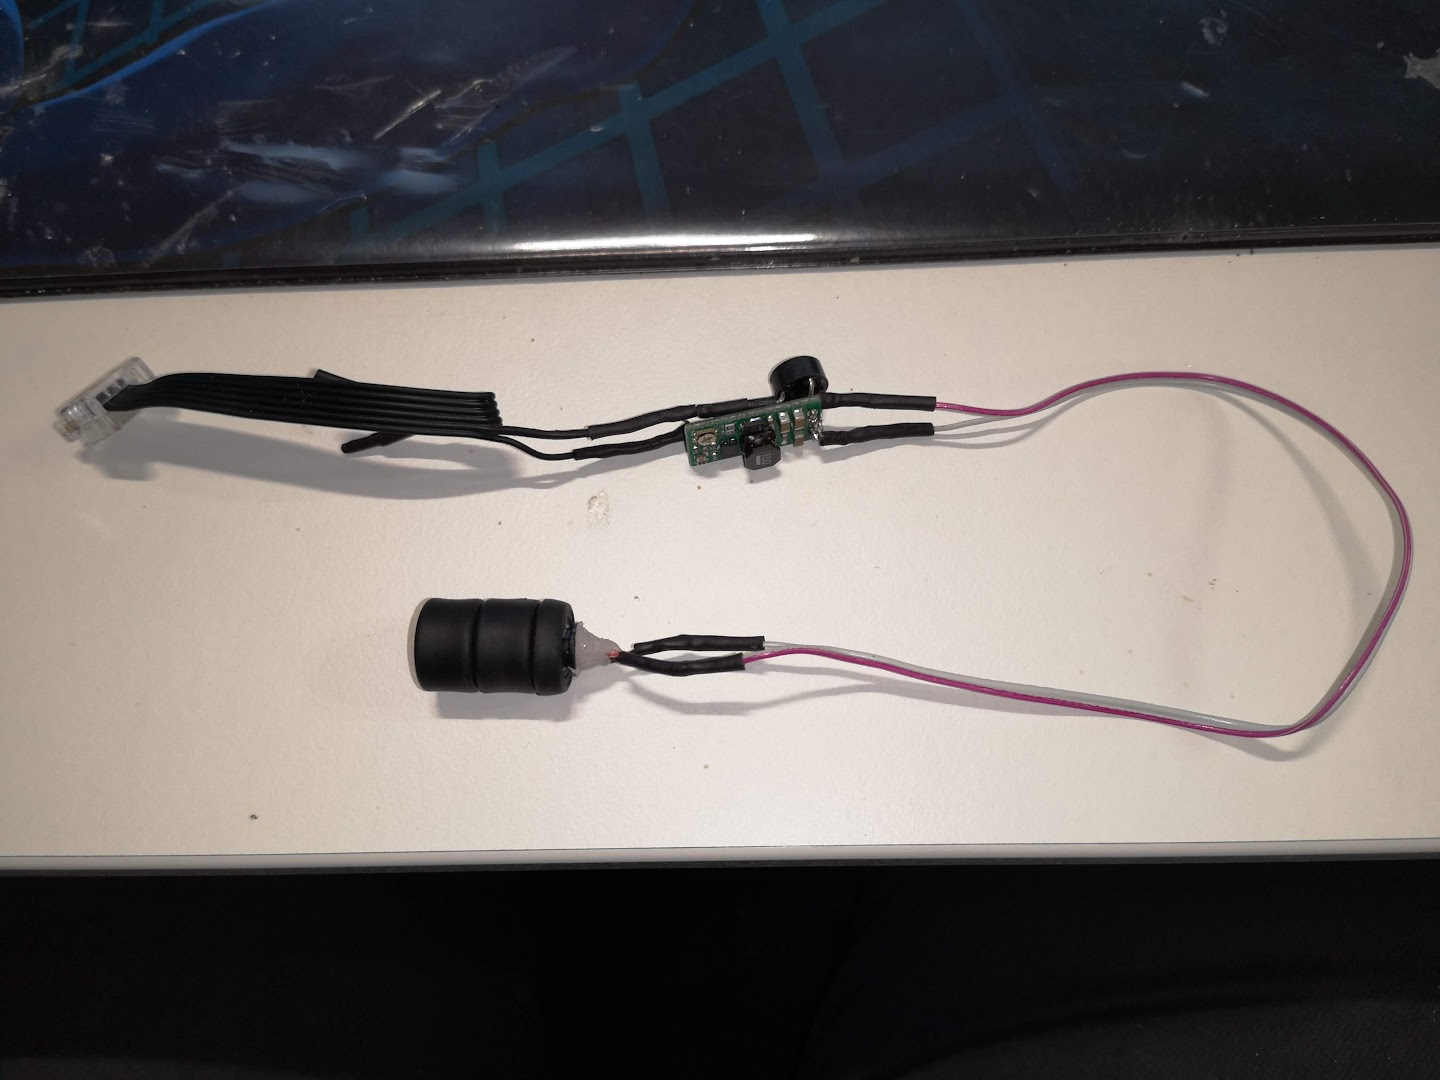
The circuit is very simple, just a small rectifier bridge and a pre-assembled small boost circuit (Pololu Adjustable Boost Regulator 4-25V, item #799):
The rectifier bridge’s function is to prevent damage to the boost circuit that don’t work with negative voltages when we reverse the direction of the “motor train”.
So how does it work?
Since we are using the same AutoID of the PUP Train Motor, the Hub will notice it as such when we connect this PUP Smoke Engine. So if we use a PUP Handset we just need to press + or – button a few times until the “train motor” receives enough voltage for the boost circuit to work and heats the Seuthe to produce smoke. Same if we use the LEGO App… unfortunately with my BR80 the App doesn’t work because the PUP M motor is not accepted as a valid train motor.
So I made my own ‘Gatto Negro’ App.
Great article, thanks for sharing the wiring info and avoiding painful, reverse engineering processes already done by others before.
Just one question in that line, anyone knows if/where the PUP connectors can be bought? Or are they exclusively produced for Lego and therefore not available (yet)?
As far as I know the connectors are proprietary. But there is a seller from China, it appeared on Facebook MINDSTORMS group a couple of times. Only the “male” connectors, unfortunately.
Thanks sir, I’ll try to find them hoping that it was easier/faster/cheaper than trying to buy broken PUP or WEDO 2 motors just for using the cable.
This summer Lego releases a new set for education
https://www.robotix.es/es/lego-education-spike
Do you think will be compatible with Boost and wedo range of motors and sensors?
And how could we use the ports to make an adaptor to control power functions motors, and read lego wedo1 sensors or even the EV3/Nxt range?
It will be electrical compatible with all PF2-type devices. The question here is firmware support… if SPIKE’s firmware space and memory are enough, LEGO will probably include support for all WeDo2/BOOST/PoweredUp/CONTROL+ devices, no reason for not doing it. An adapter for PF motors is possible, we’ve been doing it by faking the AutoID of something like the Powered Up Train Lights. But reading sensors is more difficult. It is possible with some kind of processor (like an Arduino) in between but honestly I think it’s just for geeks, the work and the cost would not attract common AFOLs.
Do you know if it would be possible to connect a mist maker like this one to the Powerup hub?
https://www.aliexpress.com/item/1005002667515884.html
if yes, is the circuit board needed or can the atomizer be connected directly to the Powerup?
It is possible but you need two things:
– a cable that emulates a Powered Device (like the LEGO Lights cable or a DIY cable)
– a voltage regulator to reduce voltage since this atomizer board uses 5V
Or if you have enough space you can use a 5V power source (like 4xAA batteries) for the circuit board and turn it on/off with a Powered Up motor, a sort of “LEGO relay” so the motor would just turn a switch on or off.