The first MINDSTORMS programmable bricks, the RCX, had several “incarnation”. Most people remember the yellow brick but there were several others, including the Code Pilot that used light sequences as commands. Those VLL codes could be printed as barcodes:
From ‘http://www.elecbrick.com/lego/’
and the Code Pilot set had a companion sheet with some codes and also key notes that could be used as a barcode piano.
So let’s try a simple set of instructions:
The barcodes are just EAN-13 code generated online from EAN-13 barcode generator. They all start with ‘560’ (the code for Portugal-based companies) and the remaining 12 digits are just 1/2/…/5 left padded with zeros. The last digit is the checksum code and is generated by the tool.
So my first program uses a nested dictionary with the EAN-13 codes paired with an action to be spoken. So the program waits for a barcode to be read, checks for the action to be spoken and execute the action we chose:
Almost 2 and a half years ago I bought a BBC micro:bit, planning to give it as a xmas present to my geek nephew. Unfortunately (for him) I decided that he wasn’t geek enough for this small ARM-based controller as I found out it was too confusing to set it up properly for BLE usage.
At that time I managed to get EV3 working with it but it was very awkward. Most of my problems were related to making a proper connection because the firmware required BT to be paired before accepting BLE commands but I also had problemas with the python BLE library I was using (gattlib).
This weekend I had a long day at work upgrading some Microsoft servers and had the time, between downloads and reboots (argh!) to return to this little fellow. So I found out it is now much, much easier to configure it… thanks to Microsoft! Yes, same Microsoft.
I used Makecode Editor to configure my micro:bit from a browser: just added the Bluetooth extension, included th e Bluetooth blocks that activate the proper BLE services and enabled using BLE without the need to pair BT first.
On the ev3dev side it was also easy to use it with python but with a different library: pygatt.
Interestingly, a new version of pygatt was released this very same weekend.
I got excited with the Snap! extension for WeDo 1.0.
Having an extension that just exposes some methods already provided by a pyhton library (WeDoMore for the WeDo 1.0) means that I can adapt it very quickly to whatever device I want as long as I have a python library.
Yesterday I returned to Snap! to fast write a LEGO WeDo 1.0 extension.
It just requires two files:
A python script that implements a very basic HTTP server that exposes the WeDo 1.0 methods from WeDoMaster library.
A xml file containg 3 Snap! custom blocks (motor, tilt sensor and distance sensor)
It works on Raspberry Pi so anyone that wants to use the LEGO WeDo 1.0 just need an RPi and a browser with internet access. I used a Raspberry Pi Zero W so just a USB Hub with microUSB port and a power source is needed.
A few months ago, trying to find an use for a new LEGO brick found in NEXO Knights sets, I made my first omni wheel. It worked but it was to fragile to be used in a robot so I decided to copy one of Isogawa’s omni wheels and keep working on an holonomic robot with 3 wheels.
Why 3 wheels?
At first I only had NEXO parts to build 3 wheels but I enjoyed the experience – my first RC experiments seemed like lobsters. Controlling the motion is not easy but I found a very good post from Miguel from The Technic Gear so it was easy to derive my own equations. But Power Functions motors don’t allow precise control of speed so I could not make the robot move in some directions. I needed regulated motors like those used with MINDSTORMS EV3.
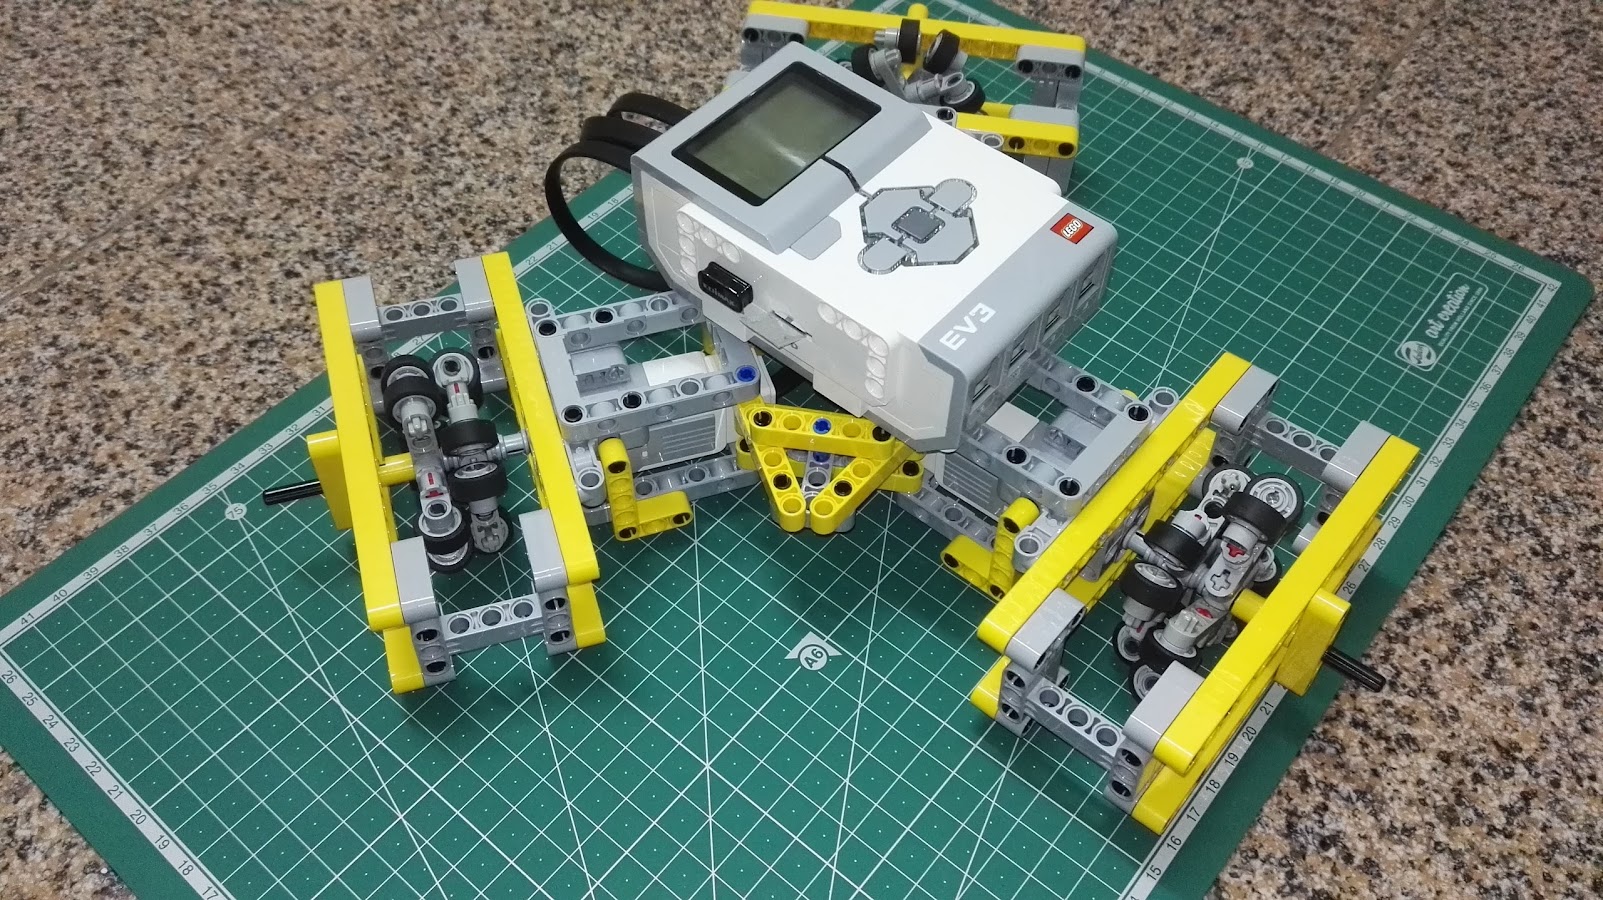
So after assembling three Isogawa’s omniwheels and making a frame that assured the wheel doesn’t separate from the motor it was just a matter of making a triangled frame to join all 3 motors and sustain the EV3:
First tests with regulated motor control seem promising: Triplex is fast enough and doesn’t fall apart. It drifts a bit so I’ll probably use a gyro sensor or a compass to correct it.
In this demo video I show Triplex being wireless controlled from my laptop keyboard through an SSH session. It just walks “forward” or “backward” (only two motors are used, running at the same speed in opposite directions) or rotates “left” or “right” (all motors are used, running at the same speed and the same direction).
For the code used in this demo I copied a block of code from Nigel Ward’s EV3 Python site that solved a problem I’ve been having for a long time: how do I use Python to read the keyboard without waiting for ENTER and without installing pygame or other complex/heavy library?
#!/usr/bin/env python3

# shameless based on
# https://sites.google.com/site/ev3python/learn_ev3_python/keyboard-control
#

import termios, tty, sys
from ev3dev.ev3 import *

TIME_ON = 250

motor_A = MediumMotor('outA')
motor_B = MediumMotor('outB')
motor_C = MediumMotor('outC')

#==============================================

def getch():
    fd = sys.stdin.fileno()
    old_settings = termios.tcgetattr(fd)
    tty.setcbreak(fd)
    ch = sys.stdin.read(1)
    termios.tcsetattr(fd, termios.TCSADRAIN, old_settings)

    return ch

#==============================================

def forward():
    motor_A.run_timed(speed_sp=-1200, time_sp=TIME_ON)
    motor_C.run_timed(speed_sp=1200, time_sp=TIME_ON)

#==============================================

def backward():
    motor_A.run_timed(speed_sp=1200, time_sp=TIME_ON)
    motor_C.run_timed(speed_sp=-1200, time_sp=TIME_ON)

#==============================================

def turn_left():
    motor_A.run_timed(speed_sp=1200, time_sp=TIME_ON)
    motor_B.run_timed(speed_sp=1200, time_sp=TIME_ON)
    motor_C.run_timed(speed_sp=1200, time_sp=TIME_ON)

#==============================================

def turn_right():
    motor_A.run_timed(speed_sp=-1200, time_sp=TIME_ON)
    motor_B.run_timed(speed_sp=-1200, time_sp=TIME_ON)
    motor_C.run_timed(speed_sp=-1200, time_sp=TIME_ON)

#==============================================

print("Running")
while True:
   k = getch()
   print(k)
   if k == 'a':
      forward()
   if k == 'z':
      backward()
   if k == 'o':
      turn_left()
   if k == 'p':
      turn_right()
   if k == ' ':
      stop()
   if k == 'q':
      exit()
#!/usr/bin/python3

# EV3 03m58s - video: https://youtu.be/w5aKqmXz_Wk
# based on a python script from  Lennart Poettering
# found here http://0pointer.de/blog/projects/mandelbrot.html

from PIL import Image, ImageDraw
import math, colorsys
import ev3dev.ev3 as ev3
from time import sleep

lcd = ev3.Screen()
lcd.clear()

sleep(1)

dimensions = (178, 128)
scale = 1.0/(dimensions[0]/3)
center = (2.0,1.0)
iterate_max = 15
colors_max = 2

img = Image.new("1", dimensions,"white")

d = ImageDraw.Draw(img)

# Calculate the mandelbrot sequence for the point c with start value z
def iterate_mandelbrot(c, z = 0):
    for n in range(iterate_max + 1):
        z = z*z +c
        if abs(z) > 2:
            return n
    return None

# Draw our image
for y in range(dimensions[1]):
    for x in range(dimensions[0]):
        c = complex(x * scale - center[0], y * scale - center[1])

        n = iterate_mandelbrot(c)

        if n is None:
            v = 1
        else:
            v = n/100.0

        if v > 0.5 :
            d.point((x,y), fill = 0)
        else:
            d.point((x,y), fill = 1)

        lcd.image.paste(img, (0,0))
        lcd.update()

del d
img.save("result.png")
sleep(1)
My EV3 is running ev3dev-jessie-2016-12-21 release. No need to install PIL or anything else, just create the script, give execution permissions and run it.
The script takes 3m58s to run. next video shows the result (4x speed):
About 10 years ago I offered my wife a M-Audio USB MIDI Keyboard and installed Ubuntu Studio on a computer so she could play some piano at home. She was so amazed with the possibility to generate music sheet while playing that almost accepted the idea of using Linux… almost 🙂
I remember that at that time I used timidity++ as a software MIDI synthesizer, tuned ALSA (one of the several Linux sound systems, perhaps the most generally used) and the preemptive kernel to work almost flawlessly with the Creative Labs sound card. My wife didn’t enjoy the KDE experience, Firefox was OK for her but OpenOffice were terribly with the spreadsheets she used and finally, when our first kid was born, she attended some English lessons at Wall Street Institute and we found out that the online lessons required an odd combination of an old version on Java, ActiveX and IE… so she returned to Windows XP and never looked back.
10 years is a LOT of time in computer systems but ALSA is still around, even on ev3dev. So I installed timidity++ and tried to play a MIDI file… to find that an ALSA module that is not currently available in ev3dev kernel is required just for MIDI.
I googled for alternatives and found fluidsynth with an unexpected bonus: there is a quite interesting python library, mingus, that works with fluidsynth. So I installed it in my Ubuntu laptop and in a few minutes I was playing harp – amazing!
In the previous example I just import the fluidsynth and Note parts of the library, initialize fluidsynth to work with ALSA loading the soundfount that cames with it, choose harp (instrument number 46) and play C3.
Well and polyphony? The correct way is to use a NoteContainer
from mingus.containers import NoteContainer
fluidsynth.play_NoteContainer(NoteContainer(["B-3", "C-3", "F-3"]))
but the lazy way is… just play several notes in a fast sequence.
So, let’s do it in the ev3dev!
Oops, fluidsynth also needs an ALSA module not available in current ev3dev kernel.
I’m not a linux music expert. Not even a linux expert! So after some more googling I gave up and asked for help in ev3dev’ GitHub project. And once again David accepted to include ALSA MIDI suport in future kernels, so I’ll just wait a bit.
Oh, but I can’t wait…
And if I read the color sensors in ev3dev and play the music in my laptop?
ALSA, once again, suports something like client/server MIDI communication with “aseqnet” and “aconnect” commands and some people are already using it with Raspberry Pi!
Yeah, I should have guessed… “aconnect” requires an ALSA MIDI module that is not available in current ev3dev kernel.
OK, let’s use MQTT: configure my EV3 as a publisher and my Ubuntu laptop as a subscriber and just send some notes as messages.
#!/usr/bin/env python

from ev3dev.auto import *
from time import sleep
import paho.mqtt.client as mqtt

DELAY = 0.01

# should have an auto-calibrate function
AMB_THRESHOLD = 9

sensor1 = ColorSensor('in1:i2c80:mux1')
sensor1.mode = 'COL-AMBIENT'
sensor2 = ColorSensor('in1:i2c81:mux2')
sensor2.mode = 'COL-AMBIENT'
sensor3 = ColorSensor('in1:i2c82:mux3')
sensor3.mode = 'COL-AMBIENT'
sensor4 = ColorSensor('in2')
sensor4.mode = 'COL-AMBIENT'
sensor5 = ColorSensor('in3')
sensor5.mode = 'COL-AMBIENT'
sensor6 = ColorSensor('in4')
sensor6.mode = 'COL-AMBIENT'

# there is no sensor7 yet, I need another MUX

s1 = 0
s2 = 0
s3 = 0
s4 = 0
s5 = 0
s6 = 0
s7 = 0

client = mqtt.Client()
client.connect("localhost",1883,60)

print 'Running...'

while True:
    key_touched = False
    s1 = sensor1.value(0)
    s2 = sensor2.value(0)
    s3 = sensor3.value(0)
    s4 = sensor4.value(0)
    s5 = sensor5.value(0)
    s6 = sensor6.value(0)
#    s7 = sensor7.value(0)

    if s1 < AMB_THRESHOLD:
        client.publish("topic/Harp", "C-3")
        key_touched=True
    if s2 < AMB_THRESHOLD:
        client.publish("topic/Harp", "D-3")
        key_touched=True
    if s3 < AMB_THRESHOLD:
        client.publish("topic/Harp", "E-3")
        key_touched=True
    if s4 < AMB_THRESHOLD:
        client.publish("topic/Harp", "F-3")
        key_touched=True
    if s5 < AMB_THRESHOLD:
        client.publish("topic/Harp", "G-3")
        key_touched=True
    if s6 < AMB_THRESHOLD:
        client.publish("topic/Harp", "A-3")
        key_touched=True
#    if s7 < AMB_THRESHOLD:
#        client.publish("topic/Harp", "B-3")
#        key_touched=True

    if key_touched == True:
        sleep(DELAY)
On the Ubuntu laptop side:
sudo easy_install paho-mqtt
The subscriber script is “harp-mqtt-sub.py”
#!/usr/bin/env python

import paho.mqtt.client as mqtt
from mingus.midi import fluidsynth
from mingus.containers.note import Note

EV3_IP = "192.168.43.35"

SOUNDFONT = 'Concert_Harp.sf2'
INSTRUMENT = 46 # Harp

NOTES = ['C-3','D-3','E-3','F-3','G-3','A-3','B-3']

def on_connect(client, userdata, flags, rc):
    print("Connected with result code "+str(rc))
    client.subscribe("topic/Harp")

def on_message(client, userdata, msg):
    global i
    if (msg.payload in NOTES):
        print msg.payload
        fluidsynth.play_Note(Note(msg.payload))

client = mqtt.Client()
client.connect(EV3_IP,1883,60)

client.on_connect = on_connect
client.on_message = on_message

fluidsynth.init(SOUNDFONT, "alsa")
fluidsynth.set_instrument(1, INSTRUMENT)

client.loop_forever()
And guess what? It works!!! I just love linux and open source!
I will keep waiting for David Lechner to include ALSA MIDI support in ev3dev’ kernel. I’m not so sure if there is enough horsepower in the EV3 to load a soundfont and play it with acceptable latency but if I can at least use the MIDI client/server functionality I can drop MQTT.
An interesting possibility that this client/server design allows is to scale my harp easily: with just a second EV3 (2 MUX each) I can make a 13-string harp with almost no modification on my code.
This is an idea I’ve been postponing for several months but the time has finally come: an laser harp.
After tinkering with lasers, fog, sound, color sensors and python I found myself wondering how to give a proper use to all that. Then I remembered Jean-Michel Jarre and how his laser harp made such a big impression on me at late 80’s when I finally decided “hey, i wanna study Electronics!”
For a first version, let’s call it “a proof of concept”, I just want a simple 7-string harp that can play the basic 7 notes. Polyphony would be great but I doubt that the EV3 sound capabilities allow that (and I cannot afford the brute force solution of using 7 EV3 so that each one plays only a single note).
So in the last months I’ve been buying EV3 color sensors and I finally have 7. Since the EV3 only has 4 input ports I need some kind of sensor multiplexer but thanks to mindsensors.com I already have one EV3SensorMux (and a second one is on the way, from an european distributor – portuguese customs DO stink!)
With 2 MUX it’s possible to connect up to 8 sensors to the EV3. Since I just want 7 “strings” I am considering using an 8th sensor to control the amplitude of the notes. I’ll try an ultrasonic sensor but I’m not sure if it has enough “wideness” to cover the whole harp, let’s see.
this was suggested to me by David Lechner in another issue, hope will be fixed soon.
To use the color sensors in python I just need to know their ports. With the MUX in port ‘in1’ and 6 color sensors connected, these are the ports to use:
So whenever the light level over one of the color sensor drops bellow AMB_THRESHOLD a note will play for TONE_LENGHT milliseconds.
Unfortunately the sound is monophonic (just one note can be played at a time) and it doesn’t sound like an harp at all – it sounds more like my BASIC games on the ZX Spectrum in the 80’s.
So I tried Sound.play(Wave File) instead. Found some harp samples, converted them to .wav files at 44100 Hz and it really sounds much better… but the length of the samples I found is to big so the “artist” have to wait for the note to stop playing before moving the hand to another “string”. Not good and also not polyphonic.
Next post I’ll show a better approach for both quality and polyphony: MIDI.
As of today (August 2016) ev3dev already recognizes the IRLink as a nxt-i2c sensor but there’s no language support for it. David Lechner suggested me using the “direct” attribute to communicate directly with the IRLink at I2C level.
Last time I wrote something mildly related to I2C was about 20 years ago for a Microchip PIC project but well… why not?
So after lots of trial and error, reading several times the LEGO Power Functions RC Protocol and shamelessly copying code from Mike Hatton (“Parax”), Xander Soldaat and Lawrie Griffiths I found on GitHub, RobotC forum and LeJOS forum I fanally managed to control a PF motor in ComboPWM mode.
In the following video, I’m increasing the motor speed (all 7 steps) then decreasing it again until it stops:
This is the python script running in the EV3:
#!/usr/bin/python

#
# based mainly on RobotC code from Mike Hatton ("Parax") and Xander Soldaat
# but also on LeJOS code from Lawrie Griffiths
#

# assumes IRLink at Input 1 as sensor0

import sys
from time import sleep

# channel: 0..3
# motorA, motorB: 0..7

channel = 0
for motorA in (1,1,2,2,3,3,4,4,5,5,6,6,7,7,6,6,5,5,4,4,3,3,2,2,1,1,0,0):

  motorB = motorA

  iBufferSize=2
  iBuffer = bytearray(iBufferSize)

  iBuffer[0] = ((0x04 | channel) << 4) | motorB
  iBuffer[1] = motorA << 4
  check = 0xF ^ (0x04 | channel) ^ motorB ^ motorA
  iBuffer[1] = iBuffer[1] | check

  oBufferSize=14
  oBuffer = bytearray(oBufferSize)

  # clear all positions
  for i in range (0,oBufferSize):
    oBuffer[i]=0

  oBuffer[0]=0x80    # Start Bit

  oBufferIdx = 0

  for iBufferByte in range (0,2):
    for iBufferIdx in range (0,8):
      oBuffer[1 + (oBufferIdx / 8)] |= (0x80 >> (oBufferIdx % 8) )
      if ( ( ( iBuffer[iBufferByte] ) & (0x80 >> (iBufferIdx % 8) ) ) != 0 ) :
        oBufferIdx = oBufferIdx + 6
      else:
        oBufferIdx = oBufferIdx + 3

# Stop bit
  oBuffer[1+ (oBufferIdx / 8)] |= (0x80 >> (oBufferIdx % 8) )

  tailIdx = 1 + (oBufferIdx / 8) + 1

  # Tail


  if (tailIdx == 10):
    oBuffer[tailIdx]= 0x10 # IRLink message payload length
    register = 0x43
  else:
    oBuffer[tailIdx]= 0x11
    register = 0x42

  oBuffer[tailIdx+1]= 0x02 # IRLink in Power Functions Mode
  oBuffer[tailIdx+2]= 0x01 # IRLInk Start transmission


# clear IRLink (not sure if correct but seems to improve)

  fd = open("/sys/class/lego-sensor/sensor0/direct", 'wb',0)
  fd.seek(0x41)
  fd.write(chr(0x46))
  fd.write(chr(0x44))
  fd.write(chr(0x4C))
  fd.write(chr(0x50))
  fd.close()
  sleep(0.1)

  for i in range(0,5):
    fd = open("/sys/class/lego-sensor/sensor0/direct", 'wb',0)
    fd.seek(register)
    for oBufferIdx in range (0,oBufferSize):
      fd.write(chr(oBuffer[oBufferIdx]))
    fd.close()

    # Power Functions timings (for a 5-command burst)
    if (i==1):
      sleep(0.064)
    elif (i==5):
      sleep(0.096)
    else:
      sleep(0.080)
A few days ago the ev3dev project launched a great feature: nightly image builds. Right after that I got a received a notice that they included in the image for Raspberry Pi 2/3 support for onboard the Bluetooth and needed to test it.
So I did test it. And found out that onboard Bluetooth indeed works… as also onboard Wi-Fi… as also the Brick Pi, no need to disable BT. Yeah, no more USB dongles!
The procedure is very simple – the really important step is freeing the hardware serial port for the BrickPi (both the onboard Bluetooth and the BrickPi need a UART so a soft UART (“miniuart”) is used for BT instead of the default one.
get the latest nightly image build for the Pi2/Pi3 (mine was 26 July 2016) and restore it to a microSD card
insert the card in the Pi3
connect an USB keyboard and a HDMI display to the Pi3
power up the Pi
login (robot + maker) – if you cannot see the login prompt change to the proper console with Alt+F1 or Alt+F2 or Alt+F[n]
run ‘sudo connmanctl’ to configure BT and Wi-Fi (see this tutorial on how to configure Wi-Fi from command line; for BT just run ‘sudo connmanctl enable bluetooth’)
edit the ‘/boot/flash/config.txt’ and uncomment these 4 lines:
dtoverlay=brickpi
init_uart_clock=32000000
dtoverlay=pi3-miniuart-bt
core_freq=250
sudo reboot
remove the display and the keyboard and from now on just connect through Wi-Fi
To test that both Bluetooth and the BrickPi work properly I used a python script to read the NXT ultrasonic sensor (in the first input port) and change the color of my WeDo 2.0 Smart Hub from green to red:
#!/usr/bin/python

# run with sudo
# assumes NXT Ultrasonic at INPUT #1

from ev3dev.auto import *
from gattlib import GATTRequester
from time import sleep

BTdevice = "hci0"       # BlueTooth 4.0 BLE capable device

WeDo2HubAddress  = "A0:E6:F8:1E:58:57"

InputCommand_hnd = 0x3a
OutputCommand_hnd  = 0x3d

RGBAbsoluteMode_cmd = str(bytearray([01,02,06,17,01,01,00,00,00,02,01]))
RGBAbsoluteOutput_cmd = str(bytearray([06,04,03]))  # or "\x06\x04\x03"

DELAY      = 0.3

# DO NOT FORGET TO CONFIG FOR US sensor:
# sudo echo nxt-i2c > /sys/class/lego-port/port0/mode
# sudo echo "lego-nxt-us 0x01" > /sys/class/lego-port/port0/set_device
#
us = UltrasonicSensor('ttyAMA0:S1:i2c1')
assert us.connected

req = GATTRequester(WeDo2HubAddress,True,BTdevice)
sleep(DELAY)

# configure RBG LED to Absolute Mode (accepts 3 bytes for RGB instead of default Index Mode)
req.write_by_handle(InputCommand_hnd,RGBAbsoluteMode_cmd)

while(True):
  if (us.value() < 10):
    print("!")
    req.write_by_handle(OutputCommand_hnd, RGBAbsoluteOutput_cmd+chr(255)+chr(0)+chr(0))
    sleep(DELAY)
  else:
    print("-")
    req.write_by_handle(OutputCommand_hnd, RGBAbsoluteOutput_cmd+chr(0)+chr(255)+chr(0))
    sleep(DELAY)
My script need the gattlib library to talk with Bluetooth Low Energy devices. You can install this library with ‘pip’ but first need to install some dependencies: