The first MINDSTORMS programmable bricks, the RCX, had several “incarnation”. Most people remember the yellow brick but there were several others, including the Code Pilot that used light sequences as commands. Those VLL codes could be printed as barcodes:
From ‘http://www.elecbrick.com/lego/’
and the Code Pilot set had a companion sheet with some codes and also key notes that could be used as a barcode piano.
So let’s try a simple set of instructions:
The barcodes are just EAN-13 code generated online from EAN-13 barcode generator. They all start with ‘560’ (the code for Portugal-based companies) and the remaining 12 digits are just 1/2/…/5 left padded with zeros. The last digit is the checksum code and is generated by the tool.
So my first program uses a nested dictionary with the EAN-13 codes paired with an action to be spoken. So the program waits for a barcode to be read, checks for the action to be spoken and execute the action we chose:
Almost 2 and a half years ago I bought a BBC micro:bit, planning to give it as a xmas present to my geek nephew. Unfortunately (for him) I decided that he wasn’t geek enough for this small ARM-based controller as I found out it was too confusing to set it up properly for BLE usage.
At that time I managed to get EV3 working with it but it was very awkward. Most of my problems were related to making a proper connection because the firmware required BT to be paired before accepting BLE commands but I also had problemas with the python BLE library I was using (gattlib).
This weekend I had a long day at work upgrading some Microsoft servers and had the time, between downloads and reboots (argh!) to return to this little fellow. So I found out it is now much, much easier to configure it… thanks to Microsoft! Yes, same Microsoft.
I used Makecode Editor to configure my micro:bit from a browser: just added the Bluetooth extension, included th e Bluetooth blocks that activate the proper BLE services and enabled using BLE without the need to pair BT first.
On the ev3dev side it was also easy to use it with python but with a different library: pygatt.
Interestingly, a new version of pygatt was released this very same weekend.
This week I got a question from Nathan Kunicki about using the BOOST Tacho Motor with the new Powered Up hub.
He already succeeded with the other WeDo 2 and BOOST devices so the motor was the last challenge. So I tried a few ideas but nothing.
I told him that probably the motor was not supported by the current firmware… and then he told me that when we use the new Remote it works (as if a WeDo 2 motor, just ON or OFF).
Well… my lovely wife just gave me this weekend my future birthday gift: the new LEGO Cargo Train. And it has a Powered Up remote so… let me try it.
No, we couldn’t find a way to control the motor. But I learned a bit about the Remote (thanks Nathan!) Enough to use it as a standalone BLE controller without the LEGO Powered Up “HUB NO.4″… it’s so easy that any BLE master can use it.
And, of course, the MINDSTORMS EV3 when running ev3dev:
A great milestone has been achieved with ev3dev-browser, an ev3dev extension for Visual Studio Code:
You just need to install Visual Studio Code, press Ctrl+P and past “ext install ev3dev-browser”, install the ev3dev-browser (currently 0.1.0 by David Lechner) and reload the IDE window.
If you have also a python extension installed and you have something running an ev3dev stretch image (2017-07-25 or newer) it will appear on the left-bottom corner pane of the IDE (“EV3DEV-DEVICES”) and you can transfer your python script to it, run them, open an SSH session…
ev3dev based on Debian Stretch is still in development (so not stable yet) but I have great expectations that we all can use it soon.
Codatex doesn’t make them aymore so I ordered one from BrickLink but never got it working with ev3dev. I put it on the shelf hoping that after a while, with ev3dev constant evolution, things would get better.
Last month Michael Brandl told me that the Codatex sensors were in fact LEGO sensors and he asked if it was possible to use with EV3.
Well, it is possible, just not with original LEGO firmware. At least LeJOS and RobotC have support for the Codatex RFID Sensor. But not ev3dev 🙁
So this holidays I put the Codatex sensor on my case, decided to give it another try.
I read the documentation from Codatex and the source code from LeJOS and RobotC and after a while I was reading the sensor properties directly from shell.
After connecting the sensor to Input Port 1 I need to set the port mode to “other-i2C”:
echo other-i2c > /sys/class/lego-port/port0/mode
Currently there are two I2C modes in ev3dev: “nxt-i2c” for known NXT devices and “other-i2c” for other I2C devices, preventing the system to poll the I2C bus.
To read all the Codatex registers this line is enough:
(wake up, send a singleshot read command, wait for aquiring, read the 5 Tag ID registers)
But it didn’t work:
Error: Write failed
No size specified (using byte-data access)
 0 1 2 3 4 5 6 7 8 9 a b c d e f 0123456789abcdef
40: 00 00 00 00 00 .....
The next days I read lots of code from the web, even from Daniele Benedettelli old NXC library. It seemed that my timings were wrong but I could not understand why.
After asking for help at ev3dev I found the reason: the Codatex sensor needs power at pin 1 for the RFID part. So the I2C works but without 9V at pin 1 all readings will fail.
LeJOS and RobotC activate power on pin1 but the two ev3dev I2C modes don’t do that. ITo be sure I tried LeJOS and finally I could read my tags:
package PackageCodatex;

import lejos.hardware.Brick;
import lejos.hardware.port.SensorPort;
import lejos.hardware.sensor.RFIDSensor;

public class Codatex
{
    public static void main(String[] args)
    {
    	RFIDSensor rfid = new RFIDSensor(SensorPort.S1);
		System.out.println(rfid.getProductID());
		System.out.println(rfid.getVendorID());
		System.out.println(rfid.getVersion());
		try {Thread.sleep(2000);}
		catch (InterruptedException e) {}
		long transID = rfid.readTransponderAsLong(true);
		System.out.println(transID);
		try {Thread.sleep(5000);}
		catch (InterruptedException e) {}
	}
}
David Lechner gave some hint on how to write a driver but honestly I don’t understand at least half of it. So I made a ghetto adapter with a MINDSTORMS EV3 cable and a 9V PP3 battery and it finally works – I can read the Codatex 4102 tags as well as my other 4001 tags:
I created a GitHub repository with the scrips to initialize the port and to use singleshot reads. Soon I will add a script for countinuous reads.
An important note for those who might try the ghetto cable: despite many pictures on the web saying that pin 2 is Ground, IT IS NOT. Use pin 1 for power and pin 3 for Ground. And preferably cut the power wire so that if you make some mistake your EV3 pin1 is safe.
Now I really do need to learn how to write a driver instead of hacking cables. Ouch!
Update: Since yesterday (25-July-2017) the ghetto cable is no longer needed. David Lechner added the pin1 activation feature to the “other-i2c” mode so since kernel 4.4.78-21-ev3dev-ev3 a standard cable is enough.
Now that communication with the Chromecast is working let’s make a small game with the few parts that I have in my “holiday bag”:
I’m using the LEGO Dimensions Toy Pad to read the NFC tags. I already scanned the ID’s of a blue and an orange tag and saved two JPEG images of the Frenchman LEGO minifigure and also the Invisible Woman (sorry, only had one minifig with me these holydays) on the web server folder so each time one of these NFC tags is recognized it’s JPEG image is presented on the TV.
A fellow from PLUG defied me to show a LEGO robot that translates conversation, much like the C3PO protocol droid from Star Wars.
I only had a couple of hours so I decided to copy the Raspsberry Pi approach of using “the Cloud”. Google offers a one year free trial so I registered and tried a few examples on my Ubuntu laptop, amazing what one can do with just a few curl commands!
So, how to use Google Cloud SDK directly from LEGO MINDSTORMS EV3?
Google has a repository for Debian but it doesn’t work with ev3dev – there are no packages for the ARM architecture. But I found someone saying that he managed to install the x86 tar.gz package on his Raspberry Pi so.. why not give it a try? And yes, it really works.
So this is the process to install Google Cloud SDK on EV3 running ev3dev. It was tested with a fresh installation of the latest release available today, “2017-06-09”
robot@ev3dev:~$
Linux ev3dev 4.4.68-20-ev3dev-ev3 #1 PREEMPT Mon May 15 12:45:40 CDT 2017 armv5tejl GNU/Linux
No dependencies needed – just download the most recent of the “Versioned archives” available for download:
tar -xvf google-cloud-sdk-158.0.0-linux-x86.tar.gz
./google-cloud-sdk/install.sh
The install takes 5 minutes:
Welcome to the Google Cloud SDK!

To help improve the quality of this product, we collect anonymized usage data
and anonymized stacktraces when crashes are encountered; additional information
is available at <https://cloud.google.com/sdk/usage-statistics>. You may choose
to opt out of this collection now (by choosing 'N' at the below prompt), or at
any time in the future by running the following command:

gcloud config set disable_usage_reporting true

Do you want to help improve the Google Cloud SDK (Y/n)? N

Your current Cloud SDK version is: 158.0.0
The latest available version is: 158.0.0

+------------------------------------------------------------------------------------------+
| Components |
+---------------+-----------------------------------+--------------------------+-----------+
| Status | Name | ID | Size |
+---------------+-----------------------------------+--------------------------+-----------+
| Not Installed | Cloud Datalab Command Line Tool | datalab | < 1 MiB |
| Not Installed | Cloud Datastore Emulator | cloud-datastore-emulator | 15.4 MiB |
| Not Installed | Cloud Datastore Emulator (Legacy) | gcd-emulator | 38.1 MiB |
| Not Installed | Cloud Pub/Sub Emulator | pubsub-emulator | 21.0 MiB |
| Not Installed | gcloud Alpha Commands | alpha | < 1 MiB |
| Not Installed | gcloud Beta Commands | beta | < 1 MiB |
| Not Installed | gcloud app Java Extensions | app-engine-java | 132.2 MiB |
| Not Installed | gcloud app Python Extensions | app-engine-python | 6.4 MiB |
| Installed | BigQuery Command Line Tool | bq | < 1 MiB |
| Installed | Cloud SDK Core Libraries | core | 6.1 MiB |
| Installed | Cloud Storage Command Line Tool | gsutil | 2.9 MiB |
| Installed | Default set of gcloud commands | gcloud | |
+---------------+-----------------------------------+--------------------------+-----------+
To install or remove components at your current SDK version [158.0.0], run:
 $ gcloud components install COMPONENT_ID
 $ gcloud components remove COMPONENT_ID

To update your SDK installation to the latest version [158.0.0], run:
 $ gcloud components update

Modify profile to update your $PATH and enable shell command
completion?

Do you want to continue (Y/n)? Y

The Google Cloud SDK installer will now prompt you to update an rc
file to bring the Google Cloud CLIs into your environment.

Enter a path to an rc file to update, or leave blank to use
[/home/robot/.bashrc]:

Backing up [/home/robot/.bashrc] to [/home/robot/.bashrc.backup].
[/home/robot/.bashrc] has been updated.

==> Start a new shell for the changes to take effect.

For more information on how to get started, please visit:
 https://cloud.google.com/sdk/docs/quickstarts
Now exit from the SSH session and login again. The SDK commands should be available so let’s configure our environment:
robot@ev3dev:~$ gcloud init
This will take about 6 minutes:
Welcome! This command will take you through the configuration of gcloud.

Your current configuration has been set to: [default]

You can skip diagnostics next time by using the following flag:
 gcloud init --skip-diagnostics

Network diagnostic detects and fixes local network connection issues.
Checking network connection...done.
Reachability Check passed.
Network diagnostic (1/1 checks) passed.

You must log in to continue. Would you like to log in (Y/n)? Y

Go to the following link in your browser:

https://accounts.google.com/o/oauth2/auth?redirect_uri=urn%3Aietf%3Awg%3Aoauth%3A2.0%3Aoob&prompt=select_account&response_type=code&client_id=32555940559.apps.googleusercontent.com&scope=https%3A%2F%2Fwww.googleapis.com%2Fauth%2Fuserinfo.email+https%3A%2F%2Fwww.googleapis.com%2Fauth%2Fcloud-platform+https%3A%2F%2Fwww.googleapis.com%2Fauth%2Fappengine.admin+https%3A%2F%2Fwww.googleapis.com%2Fauth%2Fcompute+https%3A%2F%2Fwww.googleapis.com%2Fauth%2Faccounts.reauth&access_type=offline
Just copy the link in last paragraph and open it on your browser. You will need to login with a valid Google account. Mine was already associated with a project (‘ev3-pd’) because I already started testing the APIs on the laptop so I picked that project but you can also create a new one.
You will get a verification code like this:
6/vzSXbihAPCTeewAazTZo0YqL49qYDFUcuIR0HBDWnvz
Just copy&past it to the last prompt to continue
Enter verification code: 6/vzSXbihAPCTeewAazTZo0YqL49qYDFUcuIR0HBDWnvz

You are logged in as: [yourgoogleid@gmail.com].

Pick cloud project to use:
 [1] ev3-pd
 [2] Create a new project
Please enter numeric choice or text value (must exactly match list
item): 1

Your current project has been set to: [ev3-pd].

Do you want to configure Google Compute Engine
(https://cloud.google.com/compute) settings (Y/n)? Y

Which Google Compute Engine zone would you like to use as project
default?
If you do not specify a zone via a command line flag while working
with Compute Engine resources, the default is assumed.
 [1] asia-east1-a
 [2] asia-east1-b
 [3] asia-east1-c
 [4] asia-northeast1-b
 [5] asia-northeast1-c
 [6] asia-northeast1-a
 [7] asia-southeast1-b
 [8] asia-southeast1-a
 [9] europe-west1-d
 [10] europe-west1-c
 [11] europe-west1-b
 [12] europe-west2-a
 [13] europe-west2-b
 [14] europe-west2-c
 [15] us-central1-c
 [16] us-central1-f
 [17] us-central1-a
 [18] us-central1-b
 [19] us-east1-c
 [20] us-east1-b
 [21] us-east1-d
 [22] us-east4-a
 [23] us-east4-b
 [24] us-east4-c
 [25] us-west1-a
 [26] us-west1-b
 [27] us-west1-c
 [28] Do not set default zone
Please enter numeric choice or text value (must exactly match list
item): 9

Your project default Compute Engine zone has been set to [europe-west1-d].
You can change it by running [gcloud config set compute/zone NAME].

Your project default Compute Engine region has been set to [europe-west1].
You can change it by running [gcloud config set compute/region NAME].

Created a default .boto configuration file at [/home/robot/.boto]. See this file and
[https://cloud.google.com/storage/docs/gsutil/commands/config] for more
information about configuring Google Cloud Storage.
Your Google Cloud SDK is configured and ready to use!

* Commands that require authentication will use yourgoogleid@gmail.com by default
* Commands will reference project `ev3-pd` by default
* Compute Engine commands will use region `europe-west1` by default
* Compute Engine commands will use zone `europe-west1-d` by default

Run `gcloud help config` to learn how to change individual settings

This gcloud configuration is called [default]. You can create additional configurations if you work with multiple accounts and/or projects.
Run `gcloud topic configurations` to learn more.

Some things to try next:

* Run `gcloud --help` to see the Cloud Platform services you can interact with. And run `gcloud help COMMAND` to get help on any gcloud command.
* Run `gcloud topic -h` to learn about advanced features of the SDK like arg files and output formatting
Since I already activated a service account for my project I already had a JSON file with a private authorization key to use (if you don’t know how to do it look here). I copied it from my laptop as ‘EV3-PD.json’ and defined a path variable for Goggle Cloud SDK to find it when needed:
And we are now able to use Skynet The Cloud for our most CPU intensive tasks. Next post I will show how to transcript voice to text through Google Cloud Speech API.
After David Lechner announced ev3dev support for it I’ve been planning to offer myself a couple of BrickPi 3 from Dexter Industries (just one is not enough since the BrickPi 3 suports daisy chaining).
While I wait for european distributors to sell it (and my budget to stabilize) and since I’m also playing with magnets, I ordered a mindsensors.com Grove adapter so I can start testing Grove devices with my Ev3. Also got two Grove devices from Seeed Studio at my local robotics store, will start with the easiest one: Grove – Electromagnet.
ev3dev doesn’t have a Grove driver yet but since the adapter is an I2C device it recognizes it and configures it as an I2C host:
[  563.590748] lego-port port0: Added new device 'in1:nxt-i2c-host'
[  563.795525] i2c-legoev3 i2c-legoev3.3: registered on input port 1
Addressing the Grove adpter is easy, just need to follow the ev3dev documentation (Appendix C : I2C devices):
robot@ev3dev:~$ ls /dev/i2c-in*
/dev/i2c-in1

robot@ev3dev:~$ udevadm info -q path -n /dev/i2c-in1
/devices/platform/legoev3-ports/lego-port/port0/i2c-legoev3.3/i2c-3/i2c-dev/i2c-3
So the Grove adapter is at I2C bus #3. According to mindsensors.com User Guide, it’s address is 0x42. That’t the unshifted address but fot i2c-tools we need to use the shifted address (0x21 – at the end of the ev3dev Appendix C doc there is a table with both addresses).
Acording to the User Guide, this is the expected content of the first 24 registers:
0x00-0x07: Software version – Vx.nn
0x08-0x0f: Vendor Id – mndsnsrs
0x10-0x17: Device ID – Gadptor
So I have a v1.02 Grove adapter.
To use the Grove – Electromagnet I just need to send a “T” (0x54) to the Command Register (0x41) to set the Grove Adapter into “Transmit” mode and next set the Operation Mode, which can be “Digital_0” (sending 0x02 to the Operation Mode register at 0x42) or “Digital_1” (sending 0x03 to the Operation Mode register).
Just a warning: with an operating current of 400 mA when ON the electromagnet gets hot very quickly – not enough to hurt but don’t forget to switch it OFF after use to prevent draing the EV3 batteries.
The same method (“T” + “Digital_0” / “Digital_1”) can be used with several other Grove devices, like the Grove – Water Atomization:
(a great way to add fog effects to our creations – just be careful with short circuits; if you add some kind of parfum you can also have scent effects)
Final note: you can use the mindsensors.com Grove Adapter with native EV3 firmware (just import the available EV3-G block) but if you are using ev3dev like me be sure to use a recent kernel (as of today, “4.4.61-20-ev3dev-ev3”) because older versions had a bug that caused some communication problems with I2C devices (the Grove Adapter is an I2C device).
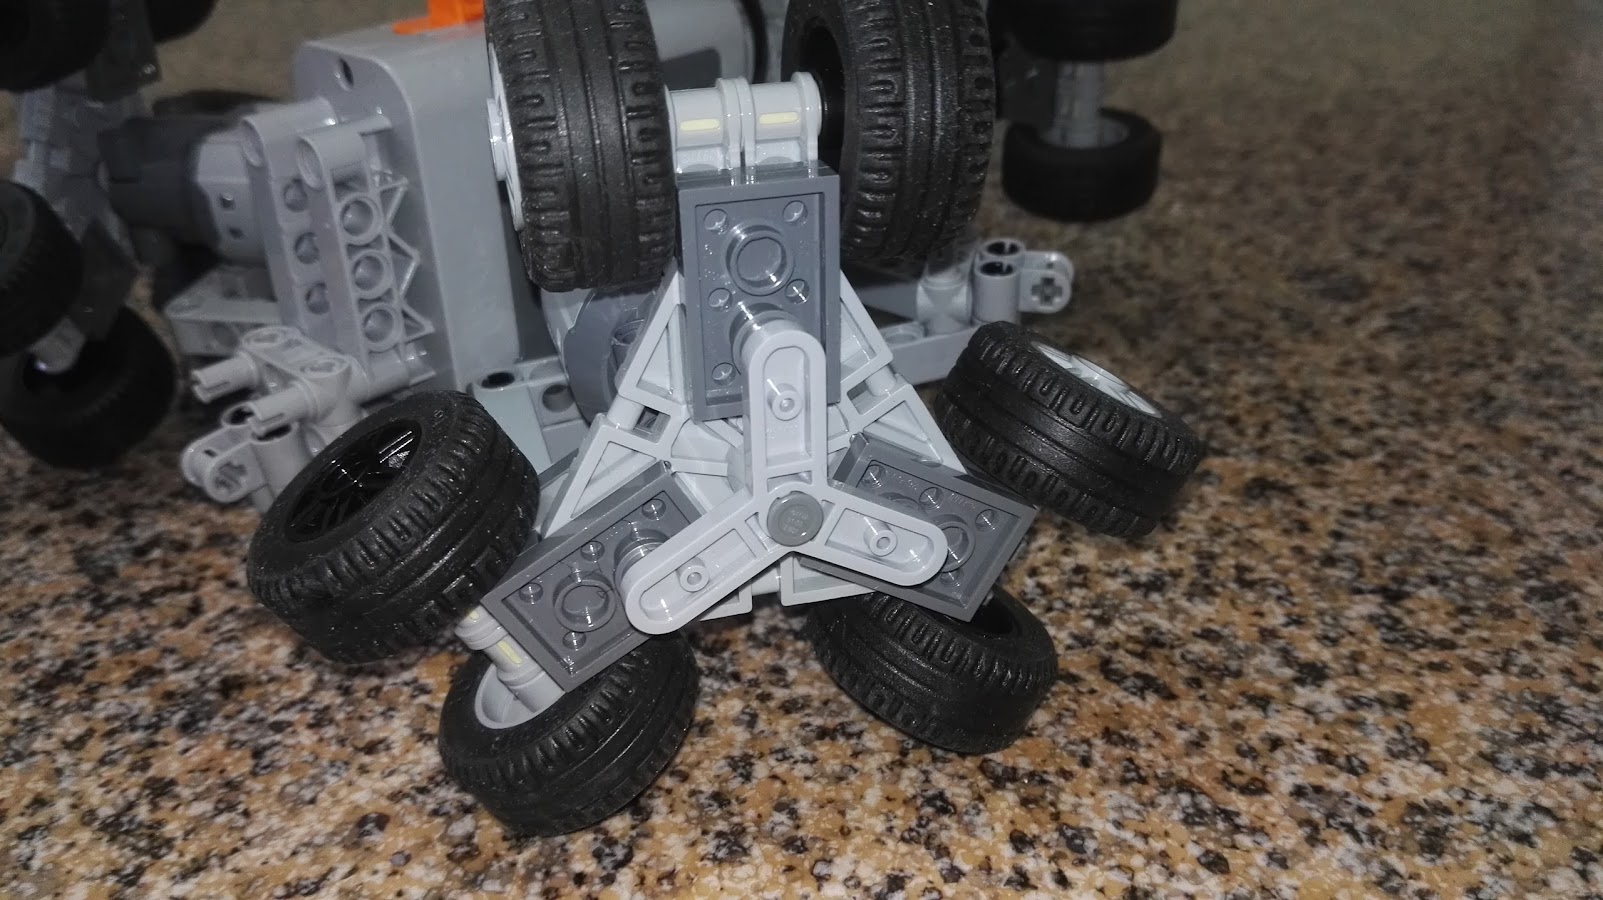
A few months ago, trying to find an use for a new LEGO brick found in NEXO Knights sets, I made my first omni wheel. It worked but it was to fragile to be used in a robot so I decided to copy one of Isogawa’s omni wheels and keep working on an holonomic robot with 3 wheels.
Why 3 wheels?
At first I only had NEXO parts to build 3 wheels but I enjoyed the experience – my first RC experiments seemed like lobsters. Controlling the motion is not easy but I found a very good post from Miguel from The Technic Gear so it was easy to derive my own equations. But Power Functions motors don’t allow precise control of speed so I could not make the robot move in some directions. I needed regulated motors like those used with MINDSTORMS EV3.
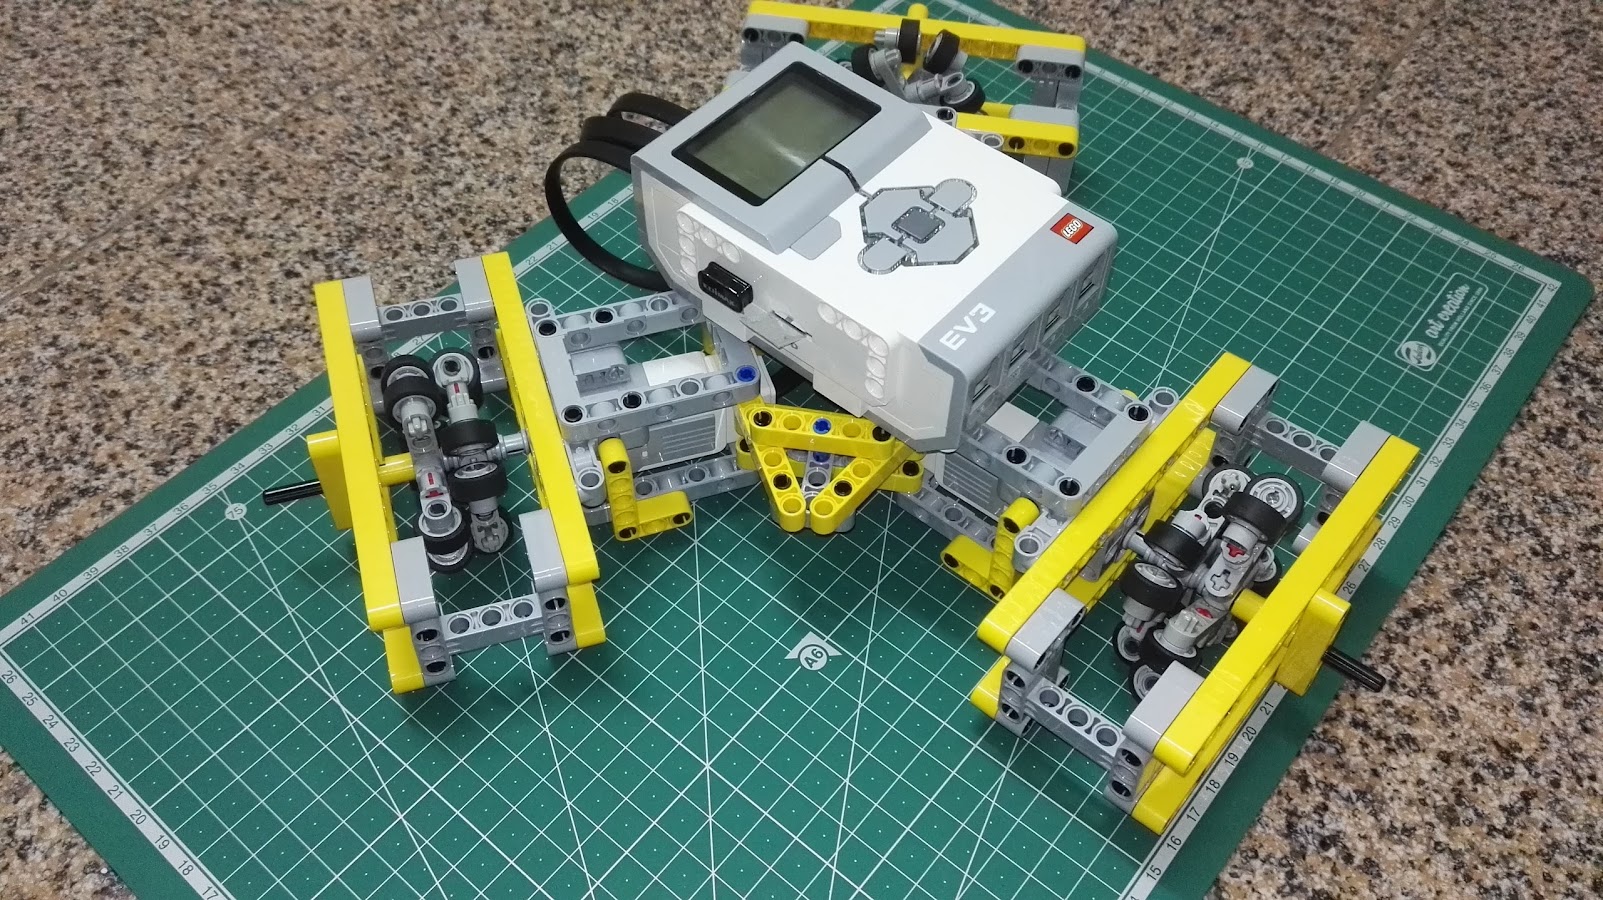
So after assembling three Isogawa’s omniwheels and making a frame that assured the wheel doesn’t separate from the motor it was just a matter of making a triangled frame to join all 3 motors and sustain the EV3:
First tests with regulated motor control seem promising: Triplex is fast enough and doesn’t fall apart. It drifts a bit so I’ll probably use a gyro sensor or a compass to correct it.
In this demo video I show Triplex being wireless controlled from my laptop keyboard through an SSH session. It just walks “forward” or “backward” (only two motors are used, running at the same speed in opposite directions) or rotates “left” or “right” (all motors are used, running at the same speed and the same direction).
For the code used in this demo I copied a block of code from Nigel Ward’s EV3 Python site that solved a problem I’ve been having for a long time: how do I use Python to read the keyboard without waiting for ENTER and without installing pygame or other complex/heavy library?
#!/usr/bin/env python3

# shameless based on
# https://sites.google.com/site/ev3python/learn_ev3_python/keyboard-control
#

import termios, tty, sys
from ev3dev.ev3 import *

TIME_ON = 250

motor_A = MediumMotor('outA')
motor_B = MediumMotor('outB')
motor_C = MediumMotor('outC')

#==============================================

def getch():
    fd = sys.stdin.fileno()
    old_settings = termios.tcgetattr(fd)
    tty.setcbreak(fd)
    ch = sys.stdin.read(1)
    termios.tcsetattr(fd, termios.TCSADRAIN, old_settings)

    return ch

#==============================================

def forward():
    motor_A.run_timed(speed_sp=-1200, time_sp=TIME_ON)
    motor_C.run_timed(speed_sp=1200, time_sp=TIME_ON)

#==============================================

def backward():
    motor_A.run_timed(speed_sp=1200, time_sp=TIME_ON)
    motor_C.run_timed(speed_sp=-1200, time_sp=TIME_ON)

#==============================================

def turn_left():
    motor_A.run_timed(speed_sp=1200, time_sp=TIME_ON)
    motor_B.run_timed(speed_sp=1200, time_sp=TIME_ON)
    motor_C.run_timed(speed_sp=1200, time_sp=TIME_ON)

#==============================================

def turn_right():
    motor_A.run_timed(speed_sp=-1200, time_sp=TIME_ON)
    motor_B.run_timed(speed_sp=-1200, time_sp=TIME_ON)
    motor_C.run_timed(speed_sp=-1200, time_sp=TIME_ON)

#==============================================

print("Running")
while True:
   k = getch()
   print(k)
   if k == 'a':
      forward()
   if k == 'z':
      backward()
   if k == 'o':
      turn_left()
   if k == 'p':
      turn_right()
   if k == ' ':
      stop()
   if k == 'q':
      exit()
#!/usr/bin/python3

# EV3 03m58s - video: https://youtu.be/w5aKqmXz_Wk
# based on a python script from  Lennart Poettering
# found here http://0pointer.de/blog/projects/mandelbrot.html

from PIL import Image, ImageDraw
import math, colorsys
import ev3dev.ev3 as ev3
from time import sleep

lcd = ev3.Screen()
lcd.clear()

sleep(1)

dimensions = (178, 128)
scale = 1.0/(dimensions[0]/3)
center = (2.0,1.0)
iterate_max = 15
colors_max = 2

img = Image.new("1", dimensions,"white")

d = ImageDraw.Draw(img)

# Calculate the mandelbrot sequence for the point c with start value z
def iterate_mandelbrot(c, z = 0):
    for n in range(iterate_max + 1):
        z = z*z +c
        if abs(z) > 2:
            return n
    return None

# Draw our image
for y in range(dimensions[1]):
    for x in range(dimensions[0]):
        c = complex(x * scale - center[0], y * scale - center[1])

        n = iterate_mandelbrot(c)

        if n is None:
            v = 1
        else:
            v = n/100.0

        if v > 0.5 :
            d.point((x,y), fill = 0)
        else:
            d.point((x,y), fill = 1)

        lcd.image.paste(img, (0,0))
        lcd.update()

del d
img.save("result.png")
sleep(1)
My EV3 is running ev3dev-jessie-2016-12-21 release. No need to install PIL or anything else, just create the script, give execution permissions and run it.
The script takes 3m58s to run. next video shows the result (4x speed):