Qi charger – more details

This post is part 3 of 4 of  Wireless charger

So I found a 2.4A USB charger:

Carregador Parede 2Hix 4*Usb (2*2.4A+2*1.0A) Preto

Already tried a 3A model but it was a dual USB port and no info about each port limit, I suspect it is 1.5A for each.

So I started charging my EV3 again, with ev3dev running. But removed the USB hub and the CRS 4.0 dongle, left just the Edimax wi-fi dongle. Also disconnected 2 large EV3 motors I had:

162666

163 mA (43 mA less than previous attempts)

Is started from last night “full” charge with same Qi emitter and receiver (but EV3 OFF), 7.23 Volt

7232133

After 45 minutes it charged to 0.1 V more (7330466). After that it slowed down but still charge up to 7350466 exactly 1h57m after.

Then it started to behave strangely again, discharging to 7262466 after another 35 minutes. Then it stayed there for the next 20 minutes.

Both RED and GREEN lights are ON (EV3 battery). And the Qi devices seem  coupled.

7.26V is just 0.03V more than last night “full” charge result. Perhaps it is the best I can get with the boost circuit’s output trimmed to 9.02V.

If that’s the limit, then using a better USB charger and/or reducing EV3 current consumption by 43 mA helped. But it still isn’t enough for a mobile robot, adding a couple of motors and sensors will raise consumption above the nearby threshold and the robot will just discharge slower until it shuts down.

I wish the EV3 had a Real Time Clock and wake up function. Crazy ideas accepted 🙂

Issues with wireless charger

This post is part 2 of 4 of  Wireless charger

Had been struggling with my wireless charger.

Turns out that with the EV3 ON it never charges. It starts, gets a few decimals of Volt and then it starts discharging.

The EV3 battery LEDs are both ON (RED and GREEN, meaning it is charging). Battery level, according to

cat /sys/class/power_supply/lego-ev3-battery/voltage_now

is 6912400 so 6.9 Volt

The Qi emitter is using a 2A USB charger. The LED shows it is coupled with the Qi receiver. For the first 15 minutes or so it charges a bit but no more that 0.1V… then it starts discharging. After 3 hours, the ev3dev turns itself OFF.

Tried a different Qi emitter. Also a few different USB chargers. The Qi emitter gets hot. Sometimes one of them blinks, I thought it was a coupling problem but now I think it is an overcurrent or thermal protection…

Not sure about the efficiency of this Qi couple and also not sure about the efficiency of the boost circuit… I suspect that I need more than 2A through the emitter to get a full charge and they can’t handle it more than a few minutes and then they “throttle” current.

I trimmed the boost circuit to give 9.02 V instead of 10.02 V. Less voltage should mean more current available but didn’t notice any effect.

Last night I left the battery charging  with EV3 off (it had not enough charge for ev3dev to keep running) . This morning the GREEN light was ON and the RED was off so it charged. Turning EV3 ON it reported

7263733

So the battery is not quite full charged but much better than what I get with EV3 ON.

With a small 4-port USB hub, an Edimax wi-fi dongle and a CSR 4.0 BT/BLE dongle the ev3dev reports 208 mA

cat /sys/class/power_supply/lego-ev3-battery/current-now
20800

I plan to get a current meter and watch consumption with several dummy loads. Perhaps I can tune my gadget a bit but I think I’ll have to find a better Qi receiver (and probably also a better Qi emitter).

So, for now, Juan’s idea of using this for charging an autonomous Ev3 robot is paused. The better we can do is bringing the robot to the charging point and turn it OFF to let it charge. But someone has to go there to turn it ON again after charging is complete.

New version of python-ev3dev available

python-ev3dev v2 available in beta (just for stretch)

The highlights include:

  • New classes are available for coordinating motors: ev3dev2.motor.MotorSet, ev3dev2.motor.MoveTank, ev3dev2.motor.MoveSteering, and ev3dev2.motor.MoveJoystick.
  • Classes representing a variety of motor speed units are available and accepted by many of the motor interfaces: see our docs to learn more.
  • Friendlier interfaces for operating motors and sensors: check out ev3dev2.motor.Motor.on_for_rotations and the other on_for_* methods on motors.
  • Easier interactivity via buttons: each button now has wait_for_pressed, wait_for_released and wait_for_bump
  • Improved ev3dev2.sound.Sound and ev3dev2.display.Display interfaces
  • New color conversion methods in ev3dev2.sensor.lego.ColorSensor

Broadcom-based USB BLE dongle

Found my BT BLE dongle with the Broadcom chipset.

It’s a “Targus Bluetooth v4.0 Dual-mode Dongle ACB75A” that is sold at Staples.

dmesg:

usb 1-1: new full-speed USB device number 9 using xhci_hcd
usb 1-1: New USB device found, idVendor=0a5c, idProduct=21e8
usb 1-1: New USB device strings: Mfr=1, Product=2, SerialNumber=3
usb 1-1: Product: BCM20702A0
usb 1-1: Manufacturer: Broadcom Corp
usb 1-1: SerialNumber: 5CF370878D54
Bluetooth: hci1: BCM: chip id 63
Bluetooth: hci1: BCM: features 0x07
Bluetooth: hci1: BCM20702A
Bluetooth: hci1: BCM20702A1 (001.002.014) build 0000
bluetooth hci1: Direct firmware load for brcm/BCM20702A1-0a5c-21e8.hcd failed with error -2
Bluetooth: hci1: BCM: Patch brcm/BCM20702A1-0a5c-21e8.hcd not found

hciconfig:

hci1:	Type: Primary  Bus: USB
	BD Address: 5C:F3:70:87:8D:54  ACL MTU: 1021:8  SCO MTU: 64:1
	UP RUNNING 
	RX bytes:1052 acl:0 sco:0 events:63 errors:0
	TX bytes:4898 acl:0 sco:0 commands:63 errors:0
	Features: 0xbf 0xfe 0xcf 0xfe 0xdb 0xff 0x7b 0x87
	Packet type: DM1 DM3 DM5 DH1 DH3 DH5 HV1 HV2 HV3 
	Link policy: RSWITCH SNIFF 
	Link mode: SLAVE ACCEPT 
	Name: 'xxxx'
	Class: 0x1c010c
	Service Classes: Rendering, Capturing, Object Transfer
	Device Class: Computer, Laptop
	HCI Version: 4.0 (0x6)  Revision: 0x1000
	LMP Version: 4.0 (0x6)  Subversion: 0x220e
	Manufacturer: Broadcom Corporation (15)

so it’s a Broadcom BCM20702A chipset and my Ubuntu doesn’t find the firmware needed. It still works without firmware but I went after it.

This site helped:

wget https://s3.amazonaws.com/plugable/bin/fw-0a5c_21e8.hcd
sudo cp fw-0a5c_21e8.hcd /lib/firmware/brcm/BCM20702A1-0a5c-21e8.hcd

I got my script working with 6 LEGO BLE devices. And 7. And even 8:

But latency isn’t great (with 8 I had to decrease the loop period from 1 second to 0.25 to prevent connection drops and even send the initial command twice to the Handset to hold the session) so even if it supports 14 sessions I doubt that we can make good use of 14 LEGO LPF2 hubs with just one dongle.

To reduce latency we can add more dongles. But even so, when a command takes 0.2 to 0.3 seconds to complete before we can send the next one, it’s hardly interesting for robotics. A Powered Up based robot will require a real autonomous device, able to read its own sensors and react on the fly, not with half a second round trip delay to the “brain”.

Also tried the script without the firmware. It works but with a few “connect error: Function not implemented (38)”.

And also re-tried the Cambridge CSR 4.0. It clearly states that it can’t handle the sixth: “connect error: Too many links (31)”

Controlling several LEGO BLE devices at same time

Yeap. CSR 4.0 on Ubuntu can control 5 different BLE devices:

Bash script:

#!/usr/bin/env bash

#usage: ./rgbled.sh hci0

HCI=$1

#DELAY=0.03
DELAY=0

#colors
OFF=0
PINK=1
PURPLE=2
BLUE=3
LIGHTBLUE=4
LIGHTGREEN=5
GREEN=6
YELLOW=7
ORANGE=9
RED=9
WHITE=A

#hubs
PUPA="90:84:2B:06:AB:5D"
PUPB="90:84:2B:03:CA:6E"
BOOSTA="00:16:53:A3:47:EA"
HANDSETA="A4:34:F1:CE:DC:A2"
WEDOA="A0:E6:F8:1B:FF:9B"

function remoteLED () {
    gatttool -i $HCI -b $PUPA --char-write-req --handle 0x0e --value 080081321151000$1
    sleep $DELAY
    gatttool -i $HCI -b $PUPB --char-write-req --handle 0x0e --value 080081321151000$1
    sleep $DELAY
    gatttool -i $HCI -b $BOOSTA --char-write-req --handle 0x0e --value 080081321151000$1
    sleep $DELAY
    gatttool -i $HCI -b $HANDSETA --char-write-req --handle 0x0b --value 080081341151000$1
    sleep $DELAY
    gatttool -i $HCI -b $WEDOA --char-write-req --handle 0x3d --value 0604010$1
    sleep $DELAY
}

# activate notifications and keep changing colors
gatttool  -i $HCI -b $PUPA --char-write-req --handle 0x0f --value 0100
sleep $DELAY
gatttool -i $HCI -b $PUPB --char-write-req --handle 0x0f --value 0100
sleep $DELAY
gatttool -i $HCI -b $BOOSTA --char-write-req --handle 0x0f --value 0100
sleep $DELAY
gatttool -i $HCI -b $HANDSETA --char-write-req --handle 0x0c --value 0100
sleep $DELAY

while :
do
    for color in $OFF $PINK $PURPLE $BLUE $LIGHTBLUE $LIGHTGREEN $GREEN $YELLOW $ORANGE $RED $WHITE; do
        remoteLED $color
        sleep 1
    done
done

Controlling multiple Powered Up devices

About two years ago I had a dual SBrick “train” setup controlled with my EV3. I never really got much far because there were some hiccups when using one USB BLE dongle to control two SBrick at the same time that didn’t occur with my Ubuntu laptop (same dongle, a CSR 4.0).

By that time, the ev3dev had a BlueZ stack much older than my Ubuntu so I decided to wait and as usual I forgot about it.

Today I’m testing how many Powered Up hubs I can control at the same time with just one BLE “client”. Just a simple bash script, changing the RGB LED colors of the hubs at the same time.

My laptop could control 2. But started to had issues with 3, failing some commands:

Characteristic Write Request failed: Request attribute has encountered an unlikely error

Perhaps sending 3 gatttool commands in-a-row was too much so added a small delay. It got worst:

connect error: Connection timed out (110)

Tuning to a small delay (0.03) seems to be the best but is strange.

Now this laptop is no longer the same I had and it now has an onboard BLE 4.2 chipset, from Intel. Not sure which version.

But I still have the CSR 4.0 dongle on the Ev3 over the desk. So let’s try same script with it.

No errors at all. Not even with 0 delay.

These last years David has been doing a great job with ev3dev kernel so my EV3 and my Ubuntu laptop are now pretty close: (4.14.58-ev3dev-2.2.1-ev3 against 4.15.0-29-lowlatency #31-Ubuntu SMP PREEMPT) so I don’t think this is a BlueZ issue.

I read somewhere that CSR 4.0 allows 5 sessions. So I need to test my script again with more LEGO hubs. But wonder why the Intel only handles two.

Now the script:

#!/usr/bin/env bash

#colors
OFF=0
PINK=1
PURPLE=2
BLUE=3
LIGHTBLUE=4
LIGHTGREEN=5
GREEN=6
YELLOW=7
ORANGE=9
RED=9
WHITE=A

#hubs
PUPA="90:84:2B:06:AB:5D"
PUPB="90:84:2B:03:CA:6E"
BOOSTA="00:16:53:A3:47:EA"

DELAY=0.03

function remoteLED () {
    gatttool -b $PUPA --char-write-req --handle 0x0e --value 080081321151000$1
    sleep $DELAY
    gatttool -b $PUPB --char-write-req --handle 0x0e --value 080081321151000$1
    sleep $DELAY
    gatttool -b $BOOSTA --char-write-req --handle 0x0e --value 080081321151000$1
    sleep $DELAY
}

# activate notifications and keep changing colors
gatttool -b $PUPA --char-write-req --handle 0x0f --value 0100
sleep $DELAY
gatttool -b $PUPB --char-write-req --handle 0x0f --value 0100
sleep $DELAY
gatttool -b $BOOSTA --char-write-req --handle 0x0f --value 0100
sleep $DELAY

while :
do
    for color in $OFF $PINK $PURPLE $BLUE $LIGHTBLUE $LIGHTGREEN $GREEN $YELLOW $ORANGE $RED $WHITE; do
        remoteLED $color
        sleep 1
    done
done

Buy the way, controlling 2 Powered Up “Hub NO.4” and 1 BOOST “Move Hub” at the same time from a single EV3  is already pretty good (if the old hiccups problems are fixed): that’s potentially 8 more motors!

[edit]

Now this is interesting:

I have news, because i did a test. The Broadcom BCM20702 Bluetooth Dongle can handle up to 14 BLE device connections simulateous.
And overall it’s a lot faster than this one from Cambridge Silicon Radio (can handle a max. of 5 BLE device connections simulateous).

Need to search my drawers… almost 100% sure I had a Broadcom LE USB dongle that gave up because ev3dev didn’t like it as much as the Cambridge CSR.
Also Raspberry Pi is Broadcom… time to get back to BrickPi3.

Logic is the beginning of wisdom

This post is part 1 of 8 of  Sniffing the LEGO Interactive Motor

I hope Spock is right because I’m not sure if an headache is a sign of wisdom
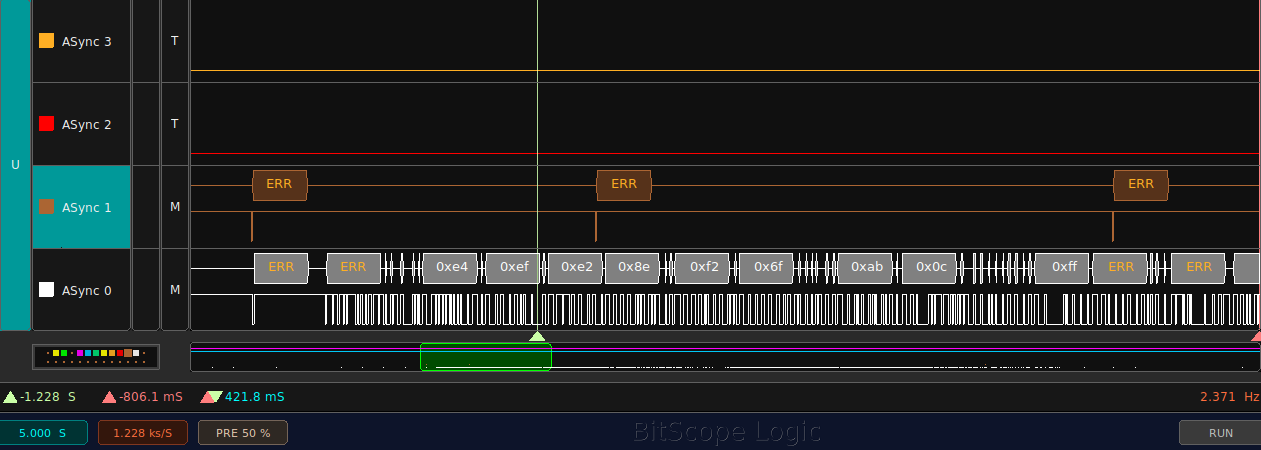
First capture

So the only affordable Logic Analyser that works with Linux and I could get nearby to get rid of portuguese evil customs was the BitScope Micro (BS05).

Installation on Ubuntu was easy (amazing how things evolved!) and it works. Documentation isn’t great but it is enough.

Now the tough part: finding sense in all captured data. 300 baud inverted seems… something.

Bash script to control Powered Up motor

Ben Hughes asked for the code for the demo video “LEGO MINDSTORMS EV3 controlling Powered UP motor” so here it is:

#!/usr/bin/env bash

event_left='*code 105 (KEY_LEFT), value 1*'
event_right='*code 106 (KEY_RIGHT), value 1*'
event_down='*code 108 (KEY_DOWN), value 1*'
event_up='*code 103 (KEY_UP), value 1*'
event_enter='*code 28 (KEY_ENTER), value 1*'

function finish {
    # terminate all subshells
    kill 0
    # reset all motors
    gatttool -i hci0  -b 90:84:2B:06:AB:5D --char-write-req --handle 0x0e --value 0800810011510000
    gatttool -i hci0  -b 90:84:2B:06:AB:5D --char-write-req --handle 0x0e --value 0800810111510000
}
trap finish EXIT


{
    while :
    do
        gatttool -i hci0  -b 90:84:2B:06:AB:5D --char-write-req --handle 0x0e --value 0800810011510000
        sleep 0.35
    done
}&


while :
do
    evtest '/dev/input/event1' | while read line
    do
#        echo $line
        case $line in
            $event_left)
                echo "LEFT"
                gatttool -i hci0 -b 90:84:2B:06:AB:5D --char-write-req --handle 0x0e --value 0800810011510060
                sleep 0.1
                ;;
            $event_right)
                echo "RIGHT"
                gatttool -i hci0 -b 90:84:2B:06:AB:5D --char-write-req --handle 0x0e --value 08008100115100A0
                sleep 0.1
                ;;
           $event_down)
                echo "DOWN"
                gatttool -i hci0 -b 90:84:2B:06:AB:5D --char-write-req --handle 0x0e --value 0800810011510000
                sleep 0.1
                ;;
           $event_up)
                echo "UP"
                ;;
           $event_enter)
                echo "ENTER"
                ;;
        esac
    done
done


The BLE properties

This post is part 2 of 2 of  LEGO Powered Up Remote Control

First things first: the Remote Control BT Address and friendly name:

A4:34:F1:CE:DC:A2  “Handset”

The BT address is not a LEGO one like the BOOST (00:16:53, “LEGO System A/S IE Electronics Division”) or the Powered Up (90:84:2B, “LEGO System A/S”). It’s a Texas Instruments chipset, probably something like the CC2640, a ARM microcontroller with embedded BLE functions.

The usual browsing of properties with gatttool reveals 3 primary services and a few characteristics:

primary
attr handle: 0x0001, end grp handle: 0x0007 uuid: 00001800-0000-1000-8000-00805f9b34fb
attr handle: 0x0008, end grp handle: 0x0008 uuid: 00001801-0000-1000-8000-00805f9b34fb
attr handle: 0x0009, end grp handle: 0xffff uuid: 00001623-1212-efde-1623-785feabcd123
characteristics 
handle: 0x0002, char properties: 0x02, char value handle: 0x0003, uuid: 00002a00-0000-1000-8000-00805f9b34fb
handle: 0x0004, char properties: 0x02, char value handle: 0x0005, uuid: 00002a01-0000-1000-8000-00805f9b34fb
handle: 0x0006, char properties: 0x02, char value handle: 0x0007, uuid: 00002a04-0000-1000-8000-00805f9b34fb
handle: 0x000a, char properties: 0x1c, char value handle: 0x000b, uuid: 00001624-1212-efde-1623-785feabcd123
char-desc 
handle: 0x0001, uuid: 00002800-0000-1000-8000-00805f9b34fb
handle: 0x0002, uuid: 00002803-0000-1000-8000-00805f9b34fb
handle: 0x0003, uuid: 00002a00-0000-1000-8000-00805f9b34fb
handle: 0x0004, uuid: 00002803-0000-1000-8000-00805f9b34fb
handle: 0x0005, uuid: 00002a01-0000-1000-8000-00805f9b34fb
handle: 0x0006, uuid: 00002803-0000-1000-8000-00805f9b34fb
handle: 0x0007, uuid: 00002a04-0000-1000-8000-00805f9b34fb
handle: 0x0008, uuid: 00002800-0000-1000-8000-00805f9b34fb
handle: 0x0009, uuid: 00002800-0000-1000-8000-00805f9b34fb
handle: 0x000a, uuid: 00002803-0000-1000-8000-00805f9b34fb
handle: 0x000b, uuid: 00001624-1212-efde-1623-785feabcd123
handle: 0x000c, uuid: 00002902-0000-1000-8000-00805f9b34fb
handle: 0x000d, uuid: 00002901-0000-1000-8000-00805f9b34fb

More details from the Nordic nRF Connect app:

The first primary service (1800, Genneric Access) has 3 chars:
Device Name: Handset
Appearance: Unknown
Peripheral Preferred Connection Parameters: Connection Interval: 100.00ms-200.00ms, Slave Latency:0, Supervision Timeout Multiplier: 1000

The second primary service (1801, Generic Attribute) is empty. Not unusual since it is optional.

The last primary service has the same UUID already present on BOOST and Powered Up hubs (i.e. “00001624-1212-efde-1623-785feabcd123”). And like those it has only one characteristic, “LWP ProtocolChar”.

(side note: LWP might mean Light Weight Process or LEGO Wireless Protocol or just Lets Worsen your Pain)

Thats good: since this “Handset” shares the same primary service UUID of the other PF2 / Powered Up devices, it might also work in the same way.

So lets enable notifications and see what we got:

char-write-req 0x0c 0100
Notification handle = 0x000b value: 0f 00 04 00 01 37 00 00 00 00 10 00 00 00 10 
Notification handle = 0x000b value: 0f 00 04 01 01 37 00 00 00 00 10 00 00 00 10 
Notification handle = 0x000b value: 0f 00 04 34 01 17 00 00 00 00 10 00 00 00 10 
Notification handle = 0x000b value: 0f 00 04 3b 01 14 00 02 00 00 00 02 00 00 00 
Notification handle = 0x000b value: 0f 00 04 3c 01 38 00 00 00 00 10 00 00 00 10

Yeap! 4 devices on 5 different ports:

  • Device ’37’ on ports ’00’ and ’01’
  • Device ’17’ present on port ’34’
  • Device ’14’ present on port ‘3B’
  • Device ’38’ present on port ‘3C’

Nathan already told me that device ’37’ is associated to the buttons. So two “pads” of buttons, one on port ’00’ and other on port ’01’.

Device ’17’ is the RGB LED on the BOOST. I’ll look to it later.

Device ’14’ and ’38’, like Nathan pointed, seem Voltage and Current readings. We can activate each with:

char-write-req 0x0b 0a0041[3B/3C]000100000001

The first (3B) will generate regular messages like ’06 00 45 3b a5 0b’ and the second (3C) also generates regular messages like ’05 00 45 3c cc’

So the payload is ‘3B A5 0B’ and ‘3C CC’, reverting and converting to decimal it gives

0BA53B = 763195 = 7.63  Volt ? hard to believe with just 4 AAA batteries

converting to float = 0.00503671 = 5.037 Volt? Perhaps

CC 3C = 52284 = 52 mA ? Why just two bytes and not 4? Hmm….

We can also deactivate with

char-write-req 0x0b 0a0041[3B/3C]000100000000

Really not important, at least for now. Let’s look to the button pads and the RGB LED and give them a good use:

char-write-req --handle 0x0b --value 080081341151000X

The command works like the BOOST (just changed the port, ’32’ to ’34’) and it accepts the same 10 values:

OFF=0
PINK=1
PURPLE=2
BLUE=3
LIGHTBLUE=4
LIGHTGREEN=5
GREEN=6
YELLOW=7
ORANGE=9
RED=9
WHITE=A

Once again, not sure about the color names but those above are good enough for me…

Now the buttons, we activate them with:

char-write-req 0x0b 0a004100000100000001 (Left or 'A')
char-write-req 0x0b 0a004101000100000001 (Right or 'B')

so we now receive a notification each time there is a state change:

Left or A+ on then off:

05 00 45 00 01
05 00 45 00 00

Left or A- on then off:

05 00 45 00 ff
05 00 45 00 00

Left or A Red on then off:

05 00 45 00 7f
05 00 45 00 00

And the same happens for Right or B, just the fourth byte is now ’01’ instead of ’00’.

So we can use our new ‘Handset’ with whatever BLE capable device we want.

Next bash shell loops through the 10 RGB possible values:

#!/usr/bin/env bash

#colors
OFF=0
PINK=1
PURPLE=2
BLUE=3
LIGHTBLUE=4
LIGHTGREEN=5
GREEN=6
YELLOW=7
ORANGE=9
RED=9
WHITE=A

function remoteLED () {
    gatttool -b A4:34:F1:CE:DC:A2 --char-write-req --handle 0x0b --value 080081341151000$1
}

# activate notifications and keep changing colors
gatttool -b A4:34:F1:CE:DC:A2 --char-write-req --handle 0x0c --value 0100

while :
do
    for color in $OFF $PINK $PURPLE $BLUE $LIGHTBLUE $LIGHTGREEN $GREEN $YELLOW $ORANGE $RED $WHITE; do
        remoteLED $color
        sleep 1
    done
done

And the bash script for ev3dev from the last post:

#!/usr/bin/env bash

# identify motors
MOTORA=$(ls /sys/class/lego-port/port4/ev3-ports\:outA\:lego-ev3-l-motor/tacho-motor/)
MOTORB=$(ls /sys/class/lego-port/port5/ev3-ports\:outB\:lego-ev3-l-motor/tacho-motor/)

echo "outA:"$MOTORA
echo "outB:"$MOTORB

MOTORSPEED=1050
MOTORDELAY=0.1

# reset motor positions and initialize
echo reset > /sys/class/tacho-motor/$MOTORA/command
echo reset > /sys/class/tacho-motor/$MOTORB/command
echo brake > /sys/class/tacho-motor/$MOTORA/stop_action
echo $MOTORSPEED > /sys/class/tacho-motor/$MOTORA/speed_sp
echo brake > /sys/class/tacho-motor/$MOTORB/stop_action
echo $MOTORSPEED > /sys/class/tacho-motor/$MOTORB/speed_sp


function finish {
    # terminate all subshells
    kill 0
    # reset all motors
    echo reset > /sys/class/tacho-motor/$MOTORA/command
    echo reset > /sys/class/tacho-motor/$MOTORB/command
}
trap finish EXIT

# activate left pad
gatttool -b A4:34:F1:CE:DC:A2 --char-write-req --handle 0x0b --value 0a004100000100000001
# activate right panel
gatttool -b A4:34:F1:CE:DC:A2 --char-write-req --handle 0x0b --value 0a004101000100000001

# activate notifications and keep listening
while read -r line; do
    message=$( echo "$line" | cut -f2 -d: )
    
#    echo "Line: $line"
#    echo "Msg: $message"

    if  [[ $message = *"05 00 45 00 01"* ]]; then
        echo "L+ ON"
        echo $MOTORSPEED > /sys/class/tacho-motor/$MOTORB/speed_sp
        echo run-forever > /sys/class/tacho-motor/$MOTORB/command

    elif [[ $message = *"05 00 45 00 7f"* ]]; then
        echo "Lr ON"

    elif [[ $message = *"05 00 45 00 ff"* ]]; then
        echo "L- ON"
        echo -$MOTORSPEED > /sys/class/tacho-motor/$MOTORB/speed_sp
        echo run-forever > /sys/class/tacho-motor/$MOTORB/command

    elif [[ $message = *"05 00 45 00 00"* ]]; then
        echo "L  Off"
        echo stop > /sys/class/tacho-motor/$MOTORB/command

    elif [[ $message = *"05 00 45 01 01"* ]]; then
        echo "R+ ON"
        echo $MOTORSPEED > /sys/class/tacho-motor/$MOTORA/speed_sp
        echo run-forever > /sys/class/tacho-motor/$MOTORA/command

    elif [[ $message = *"05 00 45 01 7f"* ]]; then
        echo "Rr ON"

    elif [[ $message = *"05 00 45 01 ff"* ]]; then
        echo "R- ON"
        echo -$MOTORSPEED > /sys/class/tacho-motor/$MOTORA/speed_sp
        echo run-forever > /sys/class/tacho-motor/$MOTORA/command

    elif [[ $message = *"05 00 45 01 00"* ]]; then
        echo "R  Off"
        echo stop > /sys/class/tacho-motor/$MOTORA/command

    fi

done < <(gatttool -b A4:34:F1:CE:DC:A2 --char-write-req --handle 0x0c --value 0100 --listen)

[edit]
Ooops, forgot that EV3 already has an internal BT interface. Sometimes this script works, sometimes don’t. That’s because I don’t specify which BT interface will be used by gatttool command. We should use ‘-i hci0’ or ‘-i hci1’ but sometimes the kernel decides that hci0 is the internal one, sometimes it decides that it is the USB one.

Perhaps a udev rule can force hci0 to always be the USB one, don’t know. Bad quickfix: remove the USB BT adapter and insert it again, this forces ev3dev to switch hci devices.